
User guide


Physical installation 9
Clamping the fixture on a truss
1. Check that the rigging clamps are
undamaged and can bear at least
10 times the weight of the fixture.
Check that the structure can bear
at least 10 times the weight of all
installed fixtures, clamps, cables,
auxiliary equipment, etc.
2. Bolt each clamp securely to a
clamp attachment bracket with an
M12 bolt (minimum grade 8.8) and
lock nut.
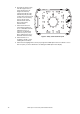
3. See Figure 4. Note the position
of the arrow on the bottom of
the base. The arrow indicates
the front of the fixture.
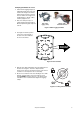
4. Align the first clamp and bracket with 2 mounting points in
the base. See Figure 5. Insert the clamp bracket’s
fasteners into the base and turn both levers a full 1/4-turn
clockwise to lock. Repeat for the second clamp.
5. Block access under the work area. Working from a stable
platform, hang the fixture on the truss with the arrow
marked FRONT printed on the base of the fixture facing
towards the area to be illuminated. Tighten the rigging
clamps.
Figure 3: Martin rigging hardware
Half-coupler Omega clamp
rigging clamp attachment bracket
SAFETY WIRE
Figure 4: Front of fixture
FRONT
90°
Figure 5: Locking 1/4-turn fasteners