
Instruction Manual


Freeze-dryer Alpha 1-2 LDplus
8 Maintenance and service
Version 11/2006, Rev. 2.0 of 02/12/2014 • sb
57
Translation of the original operating manual
Pos: 169 /20 0 Ch rist /3 60 GT-B A L abo r-Pil ot (STAND AR DMODU LE )/0 80 Wa rtun g u nd Ins tan dhalt ung/ 080 -00 10-001 0-0 010 Eis kon dens ato rkam mer (a uß er Epsil on 2 -4) @ 2 5\m od_ 1404 984 098 898 _68. docx @ 18 434 9 @ 4 @ 1
8.1.1.1 Ice condenser chamber
Before each start-up, ensure that the ice condenser chamber is free from
water residues.
• Open the media drain valve to drain off any liquid. Then, close the
valve.
• If necessary, wipe the ice condenser chamber dry with a cloth.
Pos: 170 /01 0 Uni v ersal mod ule/L eerz ei le @ 0\m od_ 120 211624 450 0_0. doc x @ 11 4 @ @ 1
Pos: 171 /20 0 Ch rist/ 360 G T-B A L abo r-Pilot (S TAND ARD MODU LE )/080 W a rtung u nd In stan dhal t ung/080 -00 10- 001 0-0 020 T rock nun gska mme r Labor @ 2 5\m od_ 140 4984100 052 _68. docx @ 18 436 3 @ 4 @ 1
8.1.1.2 Drying chamber
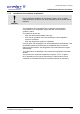
Some drying chambers are equipped with the LYO CHAMBER GUARD
splinter protection film.
• In order to prevent the film from being damaged, only use water and
commercially available window cleaning agents as well as synthetic
sponges, soft tissues or a rubber wiper for cleaning.
• Do not dry-clean any drying chambers that are equipped with LYO
CHAMBER GUARD film!
Fig. 45: Identification label on a drying chamber with a splinter protection film
Pos: 172 /01 0 Uni v ersal mod ule/S eit enwec hsel @ 0\m od_ 120 211 624 4312 _0. docx @ 10 5 @ @ 1
Pos: 173 /20 0 Ch rist/3 60 G T-BA L abo r-Pil ot (S TAND ARD MODU LE)/0 80 W artun g u nd In stan dhalt ung/ 080 -0010- 001 0-0 030 Bel üf tungs - und Medi ena blaufv entil LD plus @ 31\ mod_14 084 423 160 92_68. doc x @ 209 746 @ 4 @ 1
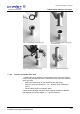
8.1.1.3 Aeration valve, media drain valve
Contaminants such as product residues may lead to an insufficient vacuum.
In this case, the aeration valve and the media drain valve must be cleaned.
• Switch the freeze-dryer off and disconnect the mains plug.
• Remove the valve core.
• Clean the valve core and the opening with a moist cloth.
• Clean the O-rings and inspect them for any damage. Damaged O-rings
must be replaced.
1 Valve opening
2 Valve core
3 O-rings
Fig. 46: Valve opening and valve core with O-rings
(example, varies depending of the type of freeze-dryer)