
User manual
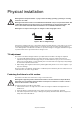
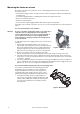


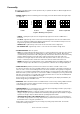

Table Of Contents
Physical installation 15
4. Fasten the carabiner clip on the Atomic Colors safety cable to the safety cable attachment point on the
right-hand side of the Atomic 3000 LED when looking at the back of the fixture. Make sure that the clip is
fully closed, repositioning the clip if necessary, so that the safety cable is secure.
5. As soon as you have installed the Atomic Colors on the Atomic 3000 LED, power the fixture on but do
not activate light output until you have completed the next three points.
6. Check the Atomic 3000 LED control panel for confirmation that the Atomic Colors is connected: INFO →
COLOR SCROLLER → CONNECTED must show YES. If it does not, check all connections, then check
the control panel again.
7. Set the following options in the Atomic Colors control panel:
• Set Fan Speed
Fn to maximum: Fn4.
• Set Light-Activated Fan LF to constant fan operation, not light-operated: LF0.
• Set Gel Saver mode
GL to active: GL1.
8. Check that you have DMX control of the Atomic Colors and that the gel string moves freely when you
change a color via DMX.
9. You can now activate the Atomic 3000 LED’s light output.