
Operating instructions


6
Input Module Installation
1. Remove Power From Unit
Modules are cold-swappable only. Damage will occur if modules are inserted or removed while unit is
powered.
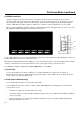
2. Remove Blank Module Cover
Using Philips screwdriver, remove the 4-40x1/8” screws. There are a total of three screws, save them for
later use.
Remove blank cover
3. Insert Optional Module
Decide which slot you intend to install module (Slot 1 or Slot 2)
Carefully align the module with the chosen slot. The raised rails will fit inside the module
Align the Module so that the three (3) mounting holes all line up with the threaded holes of the slot.
The connectors on both the module and the main-board slot should now be in alignment.
Carefully PRESS the module into the slot. Module will seat flush with the rear of the unit.
Replace the three (3) screws removed in Step 2.
*NOTE* Use ONLY 4-40x1/8” screws provided. Any screw longer than 1/8” will damage the main unit.