
Technical information

TESTING SECTION: PART 6
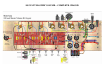
TECH NOTE: On the subject of biasing, we should discuss why we break from authenticity and install
the 1Ω resistors. These were not found in original Marshall 2203 amps, but are a worthy addition as
they allow simple bias adjustment using only a multi-meter. A task that otherwise requires a
specialized bias tool or a signal generator, dummy load and oscilloscope.
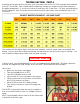
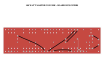
Thanks to Ohm’s Law (in this case I = E / R) with a fixed value of 1Ω for R, I and E become equal in
milliamps and millivolts respectively. We have the fortune of measuring mV across the resistor to
determine idle current in mA.
Set the bias as described and allow the amp to run for 10-15 minutes. This will give the bias time to
settle in and you may find that a slight adjustment is necessary. It is a good idea to check it again
after a few hours of operation.
TAKE A LISTEN
When you are happy with the bias, plug the amp into a speaker cabinet, set all the tone controls and
PRE-AMP VOLUME to “5” and MASTER VOLUME to “0”. Power on and listen for any unusual noise.
Slowly turn up the MASTER VOLUME and continue listening for hum, noise or other undesirable
sounds. You should only begin to hear the ubiquitous “hiss” common to all Marshall style amps when
the MASTER VOLUME control is set at “5” or higher.
If your amp seems to have more noise than it should, try swapping preamp tubes around to find the
12AX7 which is quietest in the V1 position. If the noise persists, scrutinize your input jack wiring,
ground connections, wire lengths and routing and finally try moving the amp to another location.
If all tests well, the time has come to plug in a guitar and blast some power cords!!! I suggest starting
with all controls on “5” to listen for a loud, somewhat overdriven tone. It should sound balanced from
low to high frequencies. Next, turn the PRE-AMP control up to “10”, it should deliver a very crunchy
tone. Likely a familiar tone that you’ve heard countless times live and on records.
FINISHING UP
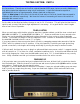
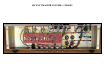
If all your tests were successful and you’re pleased with the tone, all that’s left is to bolt the chassis
into the head case. Slide the chassis in from the rear and secure in place with (4) M6 machine screws
and washers. Finally screw the rear panel in place.
Congrats! Your 100 Watt Master Volume kit is complete! I hope you enjoyed building your new amp.
And if you hit any snags along the way, I hope our email tech support, forum and online wiki were
able to provide answers.