
Technical information


TESTING SECTION: PART 2
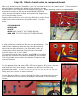
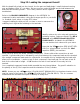
Locate and install (1) 1 AMP FUSE and (1) 4 AMP FUSE (3A for 220/240V operation). Also locate
and install (3) 12AX7 preamp tubes in V1, V2 and V3. Locate IEC AC POWER CORD.
Next, rotate the bias pot fully counter-clockwise (anti-clockwise) to ensure the
bias voltage is at maximum at first power on.
Make sure both switches, POWER and STANDBY are in the OFF position.
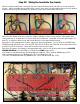
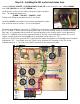
Plug in the AC power cable, but don’t turn on the
power switch. Set your meter to AC volts on a
range capable of 200V or more. Ground the
negative lead on the chassis and measure AC at the
LIVE terminal of the IEC socket with the positive
lead. You should measure approximately 120V AC
(220,230 or 240 internationally). You can measure
the voltage at your wall outlet to confirm it is the
same.
Follow the BLACK wire to the mains fuse holder and
assure that you measure the same reading on both
fuse holder terminals.
CAUTION! 120V AC
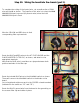
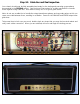
Next, move your positive meter lead to the POWER switch and
measure AC volts on the terminal with the BLACK wire. This
connects to the fuse holder and should have approximately the
same reading as the previous tests.
Note that the AC voltage from the wall will vary a bit. And
might also run consistently higher or lower than the optimal
120V. This is normal.
In fact, you can see that my voltage dropped slightly from the
previous test.
CAUTION! 120V AC
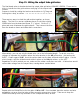
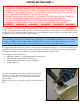
If these tests went well, we know the AC voltage is correctly flowing from the wall, through the
mains fuse and reaching the POWER switch. When we turn the switch to ON, it will energize the
power transformer, which in turn provides the correct voltage to the amp circuits. We should also see
the neon lamp inside the POWER switch light up.
Throw only the POWER switch to ON and see that it lights up. If so, proceed to the next steps. If
not, you’ll need to do some troubleshooting:
• First remove the power cord.
• Next check to see if either fuse has blown, this can be an indication of where to look for shorts.
• Retrace your work and reference the CHASSIS LAYOUT DIAGRAM for something amiss.