
Technical information
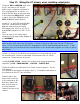
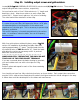

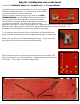

Step 24: Wiring the PRE-AMP VOLUME pot.
Locate (8”) COAX wire, (1/2”) 1/8” SHRINK TUBE.
Strip ½” of insulation and braided shielding from one end of coax wire.
Strip 1/8” of clear insulation from the center conductor and solder in
place at V1, PIN 7. Slide ½” of shrink tubing over the coax and shrink
in place.
Route the coax to the PRE-AMP VOLUME pot. Strip ¾” of
insulation.
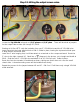
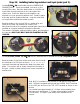
Also strip 3/8” of braided shield. Ensure no stray strands are
left hanging from the shield. Tin the shield to hold it in place.
Strip 1/8” of clear insulation from the center conductor and tin
with solder.
Attach the center conductor at pot terminal #2, as shown. >>
Also solder the shield in place on the back of the pot. Take
care not to overheat the coax wire as it can cause internal
shorting.
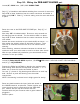
After soldering, measure resistance between the shield and
conductor with your multi-meter to test for a short (zero ohms).
With the pot rotated fully clockwise, you should read the full
resistance of the pot (1MΩ).
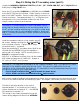
Locate (1) 500pf SILVER MICA capacitor, (1) 470kΩ 1W resistor (YELLOW-VIOLET-YELLOW-GOLD)
and (1 ½”) 18g SLEEVING.
Prepare the 500pf and 470kΩ by bending the resistor leads
and twisting them around the cap leads, as shown. >>>>
Make two or three full twists and solder in place.
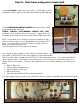
Cut two ¾” pieces of 18g sleeving and slide one on each cap
lead. Be sure to push the sleeving over the solder
connections.
NOTE: the sleeving is shown here in bright green for clarity.
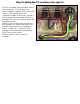
Route one lead between the input jacks and attach to
the LOWER terminal, as pictured. Solder in place and
route the other lead to terminal #1 of the PRE-AMP
pot. Assure that the cap and resistor will not
interfere with the jack contacts when a guitar cable is
plugged in.
Solder in place.