
Technical information
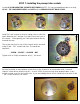

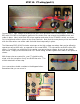

STEP 12: PT wiring (part 2).
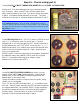
Connect the PT high voltage secondary wires (RED, RED and RED with YELLOW stripe). Route the
RED with YELLOW to the negative terminal of the mains filter cap nearest the POWER switch and
solder in place. Next, twist both RED wires together and route to the STANDBY switch, as shown.
Cut to length and solder in place on the silver terminals. Note that the extra primary wires are bundled
with the other wires now and a cable tie holds them temporarily in place.
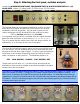
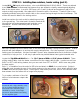
The Metroamp 1203-80-MS includes extra taps on the high voltage secondary that can be utilized to
operate an amp at 400 volts, as opposed to the normal 490V. The extra wires are BLUE with a RED
stripe. If you think you might like to try running your amp at lower voltage, do not cut any length
from these. Simply cover the ends with 1/8” shrink tubing, bundle together and cable tie into place as
shown.
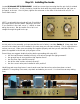
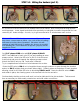
With these wires accounted for, your PT should be fully
wired, with the exception of only one BLUE bias wire. This
will be attached in a later step.
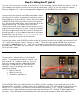
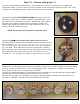
Your connections should correlate to the diagram below.
Remember that you can zoom in.