
Technical information

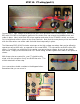
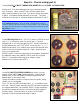

Step 10: Installing the knobs.
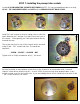
Locate (6) Marshall SET SCREW KNOBS. Install one on each pot assuring that the pot shaft is rotated
fully in either direction. If fully clockwise, install the knob with the pointer aimed at the “10” text on
the panel, as shown. Once in place, tighten the setscrew on the side of the knob with a 5/64” or
2mm Allen wrench.
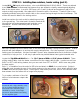
NOTE: occasionally these knobs will not fit on Alpha
pot shafts due to excess plastic material in the hole.
If you find this is the case, use a ¼” drill bit to clear
away the excess. But be careful not to let it cut
straight through the gold knob cap.
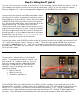
At this point in the assembly you have reached the end of what I consider Section 1. Many parts that
mount to the chassis are now installed. In the next step you will start soldering. This is a good time to
review your work. Make sure everything fits together properly and that you are satisfied with the
parts we supplied in the kit and your progress so far.
Some things we suggest double-checking before proceeding with step #11:
• Are the transformers installed correctly, with wires through the right grommets?
• Are ground lugs in every position that requires them?
• Are the filter caps oriented correctly?
• Are all the tube sockets oriented correctly?
• Are the correct value pots installed in each position?
Identifying and correcting issues is much easier now than later when wires have been cut and
soldered. If everything is accurate, step back and admire your work! You should see an amp taking
form.