
Technical information

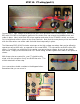

Step 9: Attaching the front panel, switches and pots.
Locate the ALUMINUM FRONT PANEL, RED ROCKER SWITCH, BLACK ROCKER SWITCH and (6)
ALPHA POTS (values: (2) 1Meg Audio, (1) 250k Linear, (2) 25k Linear).
The brushed aluminum front panel included with your kit is held in
place easily by the pots and switches on the front of the chassis.
Installation could not be simpler. Put the panel in place on the
chassis and press the RED and BLACK rocker switches in place.
RED for POWER and BLACK for STANDBY.
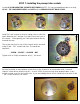
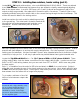
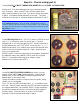
It is important that the switch is installed with the copper terminals
above the silver terminals, as shown here >>>>>>>>>>>
This is to assure that the switch turns ON in the down position, as
indicated by “1” in the text on the front of the panel.
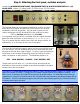
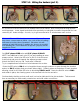
The switches will hold the panel in place, but the pots will fully secure
it to the chassis. Before installing each pot you must bend the small
tab over to the side with a pair of pliers. Do this to each pot and then
install them to the chassis referencing the picture below for which
value corresponds to each position. The hardware sequence is:
POT – LOCK WASHER – CHASSIS – FLAT WASHER - NUT
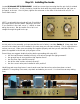
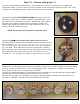
Tighten each pot nut with a ½” nut driver while assuring that the
terminals on each pot point straight up and that the edge of the panel
remains flush with the chassis.
TECH NOTE: Pots are labeled according to value i.e. “250k” and also by taper “Audio” or “Linear”. This
refers to the sweep of the pot. A linear pot will increase in equal value for every degree of rotation. So a
250k Lin pot, for example, will read 125k ohms when set at half rotation. An audio taper (also known as
Logarithmic or Log) pot on the other hand, will not reach half of the total value until approximately 80% of
full rotation. This is to make the pot respond more like our natural hearing and is why VOLUME controls
are always audio taper type pots.