
Technical information

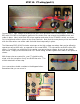

Step 8: Attaching the rear panel.
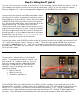
Locate the ALUMINUM REAR PANEL, Super 77 or equivalent contact cement and (4) METRIC CAGE
NUTS.
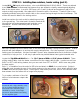
Unlike the front panel, which is held firmly in place by pots, switches and input jacks, the rear panel
needs to be secured to the chassis. We suggest contact cement for this. Here in the shop 3M brand
Super 77 is used. But any high quality adhesive will work fine.
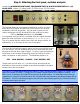
Apply a thin later of adhesive to the back of the rear panel and align the panel on the chassis. Note in
the picture below how all of the panel and chassis holes line up. The speaker jack holes are slightly
oversized and it is normal to see some chassis material here. Fortunately, contact cement sets slowly
and you can lift and re-orient the panel until it is perfect. Assure that the bottom edge is flush with
the chassis edge. Several spring clamps work great to hold the panel flat against the chassis, but a
few heavy books or similar items will do the job, as well.
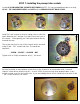
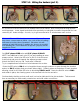
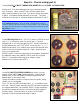
Install four cage nuts into the square holes on the chassis
mounting tabs using a large, standard screwdriver. Insert one
side of the nut in the cutout and press the other tab into place.