
Install Instructions


3
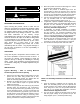
3. All 3 phase motors are bi-directional, which means
they can rotate in either direction. Follow directional
arrows on the blower wheel housings for proper
rotation. If the motor is rotating incorrectly, switch two
of the 3 phase power or motor leads and the motor will
rotate the opposite direction. Make sure all motors are
turning in the same and proper direction. (FIG. 2)
4. Replace the air intake grille(s) or filter(s) once the
product has been properly tested.
FIG. 2
FIG. 3
START-UP
This product has been assembled and tested at the
factory prior to shipping. The following procedures
should be performed to assure its performance. Before
continuing with the start-up, it is important to recognize
the safety controls furnished with the unit.
WARNING
The following items must all be completed by a qualified
installer and checked off when completed
A. Re-check that the product has been installed properly
and is level and secure.
B. Check all terminal screws are tight and field wiring is
connected in accordance to National Electrical Code
and wired per the enclosed wiring diagram. For
electric heated models, ensure that the coils are
secured and not touching each other on any metal
surface.
C. Verify proper voltage prior to powering the product.
(See product label for reference).
D. Check all field wired components “if supplied” are
wired correctly.
E. Check that the inlet air supply and the discharge air
supply are free of obstructions.
F. Check that all air filter(s) and/or air intake grille(s) are
in place and installed properly, as originally shipped.
G. Verify voltage to the product once more and turn
power on.
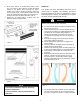
H. Regardless of whether the product is mounted on the
inside or outside of the door opening, set the air
directional vanes in the discharge nozzle slightly
outward to approximately 10-15° towards the outside,
or the wind load. (FIG. 4)
I. For products with control panels, turn the HOA (Hand-
On-Auto) selector switch to “On” position and open
the door to energize the product. For products without
NOTE
For accessory installation, reference Accessory
Installation Supplement.
For heated products, reference Heated Products
Supplement.
FIG. 4