
User manual


3
Features
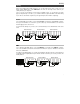
Bottom Panel
1. Power In: Use a standard power cable
(included) to connect this input to a power
outlet.
2. Power Out: Use a standard power cable to
connect this output to an additional fixture.
This connection will supply power to the
additional fixture when this one is connected a
power outlet. Please see Setup > Linking >
Power for information about linking multiple
fixtures.
3. DMX In: Use a standard 3-pin DMX cable to
connect this input (A) to your DMX controller
or (B) to another fixture that will pass DMX
data through it to this one. Gamut PAR H7
receives DMX data over this connection.
Please see Setup > Linking > DMX for
information about linking multiple fixtures.
4. DMX Out: Use a standard 3-pin DMX cable to
connect this output to an additional fixture.
Gamut PAR H7 sends its data to an additional
fixture over this connection. Please see Setup
> Linking > DMX for information about linking
multiple fixtures.
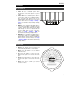
Rear Panel
1. Display: This display shows messages and
values indicating the fixture’s current status.
2. Menu: Press this button to access Gamut
PAR H7’s menu.
3. Up: Press this button to select the next-
highest menu option or to increase the value
by 1.
4. Down: Press this button to select the next-
lowest menu option or to decrease the value
by 1.
5. Enter: Press this to confirm your current
selection or value.
1234
1
2
345