
User manual


IPTV Coax Pro™ 7
ENGLISH
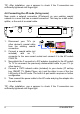
Meter cupboard example 1
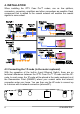
1. Position the IPTV Coax Pro™ 1P-
node as close as possible to the
DMARC in the meter cupboard or
another place where the coaxial
cable enters your home.
2. Connect the 1P-node's COAX IN
to an available connector on your
passive splitter using a coaxial
cable (not supplied) with an F-connector.
3. Please note that the (active) signal amplifier does not transfer the
signal from the IPTV Coax Pro™ nodes. Therefore, never position it
between the 1P-node and the 4P-node.
4. You can leave the To TV unused because the IP/internet signals are
also sent to your coaxial network via the 1P-node's COAX IN
connector.
5. Connect a CAT5 network cable (included) to your internet router and
connect the other end to the 1P-node's LAN port.
6. Then connect the power cable to the 1P-node and plug the adapter into
the wall outlet.
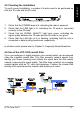
Meter cupboard example 2
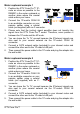
1. Position the IPTV Coax Pro™ 1P-
node as close as possible to the
DMARC in the meter cupboard or
another place where the coaxial
cable enters your home.
2. Connect the 1P-node's COAX IN
to an available connector on your
passive splitter using a coaxial
cable (not supplied) with an F-
connector.
3. You can leave the To TV unused because the IP/internet signals are
also sent to your coaxial network via the 1P-node's COAX IN
connector.
4. Connect a CAT5 network cable (included) to your internet router and
connect the other end to the 1P-node's LAN port.
5. Then connect the power cable to the 1P-node and plug the adapter into
the wall outlet.