ID2Qv6 Win Installation and Licensing Copyright © 2011 Markzware
ID2Qv6 Win Installation and Licensing 1 ID2Qv6 Quark 8 and 9 Installation for Windows 1.1 Installing and Activating ID2Qv6 for WIndows 1.
ID2Qv6 Quark 8 and 9 Installation for Windows ID2Qv6 Win Installation and Licensing - 3
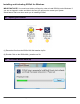
Installing and Activating ID2Qv6 for WIndows IMPORTANT NOTE: You must have Admin privileges in order to install ID2Qv6 under Windows. If you are not logged in under and Admin Account you will need to contact your System Administrator and have them assist you in installing ID2Qv6. 001 - Opening the Installer (1) Extract the files from the ID2Qv6.XX Win-Installer.zip file (2) Double-Click on the ID2Qv6Win_Installer.
003 - Begin Installing ID2Qv6 for Quark 8 & 9 When the ID2Qv6 - InstallShield Wizard window appears, click on the Next button (1) to proceed. The ID2Qv6 - InstallShield Wizard window may take several seconds to appear, so please be patient.
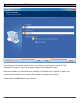
004 - Who will be using ID2Q In the Customer Information screen, enter in your Name (1) and Company name (2). This information is stored on your local computer as part of the installation record. Next select whether you want ID2Q to be available for all users of the computer or just for your account. By default this is set to Anyone who uses this computer (all users) (3). FInally click on the Next button (4) to continue.
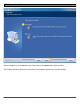
005 - Type of installation Select Complete (1) for installation type. Then click on the Next button (2) to continue. The Custom selection should only be used if Tech Support requests you use this setting.
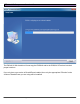
006 - What will be installed You will now see a list of what will happen during the install. Click on the Next button (1) to continue with the installation.
007 - Installation process has started The ID2Qv6.XX Win-Installer will now copy the ID2Q8v6 and/or the ID2Q9v6 XTensions into their proper locations. If you only have one version of QuarkXPress installed, then only the appropriate XTension for the version of QuarkXPress you are using will be installed.
008 - Installation process has completed When the ID2Qv6.XX Win-Installer has finished you will see the window above. Click the Finish button (1) to close the installer.
009 - Activate ID2Q for Quark 8 & 9 After you click the Finish button and close the installer, you will be presented with the LicenseControl window for ID2Q. It may take several seconds for the LicenseControl window to appear. Initially ID2Q will be Unlicensed (1).
010 - Enter your License ID by copying and pasting At this point you will need to provide your License ID in order to proceed with the activation process. For people who purchased online and received an email with their License ID electronically, copy and paste the License ID from your email into the Provide/Paste a Licensing ID area (1), then click the Next button (2) to continue. You will also need to be connected to the internet and be able to successfully reach www.derman.com.
011 - Manually entering your License ID (typically for Boxed Product Customers) Your License ID for ID2Q is very long! If you try and type the entire License ID in manually, you will almost surely make a mistake. Just one incorrect character and the code will not work. Since people who purchase Boxed versions of ID2Q may not receive an email with their License ID, you may type just the numerical portion of your License ID into the Provide/Paste a Licensing ID: area (1) .
012 - Incorrect License ID If you mistype or miscopy your License ID, you will be presented with an error as shown above. Please recheck your License ID for accuracy and re-enter it.
013 - Begin Activation Once you have successfully entered a valid License ID you will be presented with the above screen. Most people are anxious to get going and use ID2Q, so to do this, select Activate the License (1) and then click on the Next button (2).
014 - For Boxed Product Customers Only If you purchased a boxed version of ID2Q, you will be presented with an extra screen when you activate the product. The fields in red are required (Name and Email Address). Please enter accurate information, as this information is used to contact you in case you report any issues.
015 - Markzware Software License Agreement The last piece that needs to be handled before you activate ID2Q is to read and agree with Markzware's Software License Agreement. If you do not agree with the License Agreement, you will not be able to activate your copy of ID2Q. To activate your copy of ID2Q, click on the I agree to the above stated terms button (1).
016 - You are now licensed After successfully activating ID2Q, you will see a status of Licensed for this system (in green text). You are ready to go! Click on the Done button (1) to close the LicenseControl application and window.
017 - Start up QuarkXPress 8 or 9 and start converting! 018 - The ID2Qv6 Menu Once ID2Qv6 has been installed you will see a Markzware/ID2Q menu. Under this menu there are three items: 1. Convert InDesign® Document - Select this to bring up an Open File window and select the InDesign document you want to convert. 2. ID2Q Updates… - This will take you to a webpage where you can check for updates to ID2Q and other Markzware products 3.
Deactivating and Uninstalling ID2Qv6 for Windows Why would you want to deactivate ID2Q? 1. You want to use ID2Q on another computer. Deactivating ID2Q on your current computer will free up your License ID for use on another computer. 2. You are planning on sending your computer out for repair. Just to be on the safe side, it is a good idea to deactivate ID2Q before you send your computer out for repair. 3. You are planning on retiring, selling or giving away your computer.
002 - The LicenseControl Window If you have been using ID2Q, then it has been activated and will have a status of Licensed for this system (1) ID2Qv6 Win Installation and Licensing - 21
003 - Deactivate ID2Q Select De-Activate this Application's License (I'm Changing Systems) (1). Then click on the Next button (2) to continue. Important - You must be connected to the internet in order to deactivate ID2Q.
004 - Deactivation Confirmation Message If you have successfully deactivated ID2Q you will see the above confirmation screen. Once deactivated, you can use your ID2Q License ID on another system, or move ID2Q to another system. If you want to re-activate ID2Q you will need to have your License ID available, so it is best to enter it into a text file and copy-and-paste it into the required area when reactivating ID2Q. Click the OK button (1) to continue.
005 - You are now deactivated and unlicensed Once you have fully deactivated ID2Q the status on the LicenseControl window for ID2Q will show as Unlicensed (1). Click the Done button (2) to close the LicenseControl window.
006 - Confirmation of deactivation (optional) If you wish to make sure you are deactivated and unlicensed, select Show the Status of this Application's License ID (1) and then click on the Next button (2) to view the results. You must be connected to the internet to perform the above actions.
007 - No activated license for this application You should receive the above message that there are no activated licenses for this application. This indicates that you have deactivated and unlicensed ID2Q. Click the OK button (1) to close this window and return to the main LicenseControl window.
008 - You are now deactivated and unlicensed Click the Done button (1) to close the LicenseControl window.
009 - ID2Q is still installed, but is inactive You have now deactivated ID2Q, but the XTension is still installed. When ID2Q is inactive, the Convert InDesign® Document menu item is grayed out (1) and you can no longer select InDesign documents to convert. You can still leave the ID2Q XTension installed if you wish. You can re-activate it at any time by selecting License Control… and re-entering your License ID.
011 - Select program to uninstall Since you want to uninstall ID2Qv6, highlight ID2Qv6 (1) and then click on Uninstall (2) ID2Qv6 Win Installation and Licensing - 29
012 - Prompt to remove ID2Qv6 Once the InstallShield Wizard has loaded, you will be prompted whether or not you want to completely remove the selected application (in this case ID2Qv6). Click on Yes (1) to begin removing ID2Qv6.
014 - Uninstall Complete Once the InstallShield Wizard has finished uninstalling and removing ID2Qv6 you will see the screen pictured above. Click the Finish button (1) to close this window and complete the uninstall process. 015 - ID2Qv6 has been removed The Uninstall process physically removes (deletes) the ID2Q8v6 and ID2Q9v6 XTensions from your copy (or copies) of QuarkXPress 8 and/or QuarkXPress 9, it also removes the ID2Qv6 entry from your Registry.