OWNER’S MANUAL ALTAIR II STEAMER MODELS: INSTALLATION OPERATION MAINTENANCE STEAM COOKING ALTAIR II - 4 ALTAIR II - 6 ALTAIR II - 8 ALTAIR II - 10 ALTAIR II - 12 GUIDELINES PARTS LISTS PARTS & SERVICE 35 Garvey Street, Everett, MA 02149: Tel: (617) 387-4100 Fax: (617) 387-4458 custserv@mfii.com, www.mfii.
TABLE OF CONTENTS 1.0 IMPORTANT NOTES FOR SAFETY, INSTALLATION AND OPERATION ......................................... 4 2.0 INTRODUCTION ........................................................................................................................... 5 1) Product Description .......................................................................................................... 5 2) Safety Features .................................................................................................
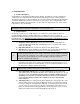
1.0 IMPORTANT NOTES FOR SAFETY, INSTALLATION AND OPERATION ! WARNING: This is the safety alert symbol. It is used to alert you to potential personal injury hazards. Obey all safety messages that follow this symbol to avoid possible injury or death. ! WARNING: Improper installation adjustment, alteration, service or maintenance can cause property damage, injury or death. Read the installation, operating and maintenance instructions thoroughly before installing or servicing this equipment.
2.0 INTRODUCTION 1) Product Description: Congratulations on purchasing the Market Forge Altair II. The Altair II is a single compartment countertop or two-compartment floor model steamer featuring pressureless steam cooking, a circulating fan inside the cooking chamber to speed cooking and an automatic preheated waterfill mechanism. Altair II also features a clean water reservoir system. The cooking chamber of the Altair II is treated with a scratch resistant, non-stick surface.
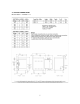
3) Dimensions: 4-pan: External dimensions are 24” wide x 26¼” high (plus 4”-6” adjustable legs) x 28 ¾“ deep (plus vent pipe). 6-pan: External dimensions are 24” wide x 33¼” high (plus 4”-6” adjustable legs) x 28 ¾” deep (plus vent pipe). 8-pan: External dimensions are 24” wide x 52½” high (plus 6”-9” adjustable legs) x 28 ¾” deep (plus vent pipe). 10-pan: External dimensions are 24” wide x 59½” high (plus 6”-9” adjustable legs) x 28 ¾” deep (plus vent pipe).
3.
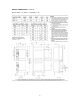
SERVICE CONNECTIONS (continued) Models: Altair II – 8, Altair II – 10 & Altair II – 12 8
4.0 INSTALLATION 1) Damage Inspection: Reporting shipping damage is the responsibility of the purchaser. Do not discard packaging if filing a freight damage claim. Upon receipt of steamer immediately inspect the exterior of packaging for damage. Remove wrapping. Inspect the exterior of the Altair II for visible shipping damage. 2) Unpacking / removal from pallet: To remove the steamer from the pallet, carefully cut the strapping.
11) Rear drain: Make sure the 1” rear drain is plumbed to a floor trough or air gap drain. Customer supplies plumbing. However, two 90° elbows are shipped loose with the steamer to be used as needed. The drip trough located under the door is plumbed to the rear of the unit using a ½” copper pipe. This can also be plumbed to a floor trough or air gap drain. WARNING: The water may be very hot. It is advisable to allow the water to cool down before draining. Leaving the door open will aid cooling.
front and the handle in back and tilting slightly to remove the drain pipe from the left side drain hole. The reservoir cover may be hot – allow to cool before handling. Remove the standpipe by lifting up until the drain stem is out of the drain opening. Lift out and clean. The drain standpipe and reservoir cover must be replaced before steamer operation or the steamer will not function properly. 6.
2 212° steam plus radiant heat 3 higher yield. Cook times will be slower than steaming. Steam cooking Heavy dense foods like meat or potatoes, retherm frozen foods. NOTE: If starchy food products (potatoes, pasta) cause water to get frothy add 2 tablespoons of cooking oil to the water to control foaming. 11) Shut down, draining and cleaning of steamer. i. Shut down: To shut down the steamer at the end of the day just turn the cooking mode selector dial to (OFF). ii.
half an hour or overnight. Loosen mineral deposits with a nylon bristled brush. Drain, wipe and rinse. Use water and vinegar to clean reservoir. Make sure two stainless probes on lower backside of cooking chamber interior are clean. Wipe out the condensate trough located under the door. Remove food particles. Make sure the drain is kept clear. NOTE: It is always advisable to leave the steamer door open when the unit is shut down for the evening. This will extend the life of your gasket.
To reorder Stellar Descaling Powder, Part Number 92-1009 (case of four 2 lb. bottles), contact your local Parts and Service agency or: Market Forge Industries, Inc. 35 Garvey Street Everett, Massachusetts 02149-4403 Telephone: (617) 387-4100 Toll Free: (866) 698-3188 Fax: (617) 387-4458 Outside MA Fax: (800) 227-2659 Parts / Price / Service Telephone: (888) 259-7076 Email: custserv@mfii.com Web Site: www.mfii.
8.0 STEAM COOKING GUIDELINES A. Cooking with atmospheric / pressureless steam: Atmospheric or pressureless steaming is perfect for a la carte cooking. The door can always be opened during cooking to add or remove pans of food, to season food or to check on its progress. Multiple products can be cooked at one time because there is no crossover of cooking flavors in atmospheric steam. Large and small portions of food can be cooked at the same time.
3) Use solid pans where appropriate: scrambled eggs, rice, beans, dehydrated foods, prepared casseroles, sauces, cake or other desserts (you can bake a cake in atmospheric steam), and when you want to prevent food from dripping on a lower pan. 4) When cooking proteins (meat, poultry or seafood) use a solid catch pan under the perforated pan. Accumulated juices can be used for soup stock, gravy or broth. 5) Protein foods (meat, poultry or seafood) can be cooked in perforated or solid pans.
3) A qualified electrician must perform all electrical hookups and meet all local codes. 4) 5) 6) 7) Installation is the responsibility of the purchaser. Failure to keep the overflow standpipe and drain clear and unobstructed may result in an unsafe condition. The steamer must be level in order for the water sensor and overflow outlet to function properly. The reservoir water may still be hot. It is advisable to let the water cool down prior to draining. The cooking chamber is designed to retain heat.
10.0 WIRING DIAGRAM A.
B.
11.0 ILLUSTRATED PARTS LIST A. Cabinet Assembly 1 2 3 4 5 Figure 4 Control Panel View Figure 3 Front View ITEM No. 1 2 3 4 5 PART No.
Cabinet Assembly (continued) 6 7 14 8 13 12 11 10 9 Figure 5 ITEM No. 6 7 8 9 10 11 12 13 14 PART No.
B. Door Assembly 4 2 3 1 Figure 6 Inside View of Door ITEM No. 1 1 2 2 3 3 4 PART No.
C. General Assembly 7 8 2 6 1a 3a 1b 3b 3c 3d 4 6 5 9 10 Figure 8 Single Oven Rear View ITEM No. 1a 1b 2 3a 3b 3c 3d 4 5 6 7 8 9 10 PART No.
General Assembly (continued) 13 14 15 15 Figure 10 Stacked Oven (Top Section) 17 16 18 11 19 17 21 15 Figure 11 Stacked Oven (Mid Section) 16 11 15 23 17 16 20 Figure 9 Stacked Oven Rear View 21 24 22 Figure 12 Stacked Oven (Bottom Section)
General Assembly (continued) ITEM No. 11 12 13 14 15 16 17 18 19 20 21 22 23 PART No. 10-0239 92-0367 92-0028 92-0700 10-4137 92-0683 08-1207 10-8045 92-0681 92-0682 92-0685 92-0684 92-0060 DESCRIPTION Rubber Hose, Black, 1” Dia Stacking Collar Copper Tubing, 1” Dia.
D. Control Panel Components 10 9 8 7 6 5 1 3 2 4 Figure 13 ITEM No. 1 2 3 4 5 6 7 8 9 10 PART No.
Control Panel Components (continued) SEE PREVIOUS PAGE FOR THESE PART NUMBERS 20 19 18 17 16 15 Figure 14 ITEM No. 15 16 PART No.
E. Convection Fan and Motor Components 3 2 4 5 6 7 1 Figure 15 Fan Motor and Pulley Assembly 9 8 10 Figure 16 Convection Fan & Inside Tubular Heater ITEM No. 1 2 3 4 5 6 7 8 9 9 10 PART No. 08-6905 08-5601 08-5600 92-0606 92-0605 92-0676 08-1414 92-0016 92-0704 92-0731 92-0732 DESCRIPTION Fan Motor (230V) Pulley, .25” Dia. Bore, (22 Teeth) Pulley, .25” Dia.