
Operating instructions


SECTION 2 INSTALLATION
2.1 RECEIVING
The unit is shipped strapped and bolted to a skid,
and covered by a corrugated container. Packing
materials must be removed prior to installation
Examine shipment for external or internal damage
and completeness. A complete shipment normally
includes the oven unit, two shelf supports and five
interior shelves, a carton containing stand
components (if a stand has been specified), and a
packet of documents pertaining to the unit.
GENERAL CAUTION: Tilt oven onto back or left
side (seen from front) to access bottom when
necessary DO NOT AT ANY TIME LAY THE OVEN
DOWN ON ITS TOP , RIGHT SIDE, OR FRONT TO
DO SO MAY DAMAGE THE EQUIPMENT AND
INVALIDATE THE WARRANTY.
2.2 ASSEMBLY
Set-up assembly procedures for the various oven
configurations are described in the following
paragraphs. Assembly requires that the stand be
completely assembled first, then set in place and the
oven mounted upon it before service connections
are completed.
2.2.1 Single Oven on Modular Base
1. Screw adjustable feet into cabinet base.
2. Mount oven to base using four 3/8 - 1 6 x 3/4 Ig.
hex head cap screws and four 3/8 plain
washers provided.
3. Proceed to subsection 23.
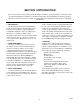
2.2.2. Oven on 7" (178mm) Stand
1. Screw legs ( Figure 2-1, #4) into top frame assembly
(1).
2. Place into position front and rear channel assembly
(2) and side angles (3). These items are loose parts
and are secured with mounting of oven to stand.
3. Mount oven to stand using four % - 1 6 x % Ig. hex
head cap screws and four % plain washers
provided.
4. If oven is to be stacked, proceed to paragraph 2.2.4.
2.2.3 Stacked Ovens on 7" (178mm) Stand
1. Mount bottom oven on stand (Figure 2-2) using
hex head screws and washers provided.
NOTE
Stand is 32" 813mm front to back. When used
with deep oven, overhang may be either front or
back, as desired. (Recommended overhang is in
back)
2. Remove upper trim strip screws on front of lower
oven. This is necessary to permit door
adjustment, if required, at a later date.
3. Stack top oven on bottom oven.
NOTE
If stacked ovens are adjacent to moisture
producing equipment (such as kettles or steam
cookers) it is necessary to prevent
condensation from entering the control section
of the bottom oven. The seam between the two
ovens, and between the ovens and the moisture
producing equipment, must be sealed with
silicone synthetic rubber or equal high grade
sealant.
4. Proceed to subsection 2.3.
2.2.4 Oven on 28" (711mm) Open Stand
1. Place top frame (Figure 2-3, #2) upside down on a
clean, smooth surface.
2. Place front and rear angle assemblies (8)
(Stainless stands only) and legs (1) into position.
3. Align holes in legs, frame and angles. Secure
using carriage bolts, lockwashers and hex nuts
provided.
4. Align holes in shelf (3) with leg holes and secure
using hardware (5,6,7).
5. Screw adjustable feet (4) into stand legs.
6. Install four clips for oven rack supports inside top
frame using hardware (5,6,7) (included with rack
support option).
7. Place stand in upright position. Install rack.
17 0393
2-1