
Operating instructions


7
InstallatIon
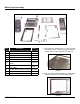
Oven Cavity Assembly
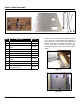
4. Then place another U-shaped split liner gasket (3)
around the top and nish by bolting the split liner top
(1) to the rest of the cavity. Now fasten each and ev-
ery bolt without moving the gaskets. Then apply sili-
con sealant to areas of need. As a reminder the front
face anges of the cavity must be ush.
Figure 12
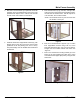
NOTE: The corner hole does not have a bolt. Other-
wise interference will occur.
Figure 13
5. Install rear cavity insulation (10) mounting over spac-
er bolts protruding from the frame liner support/back
channel.
Figure 14
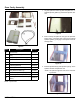
6. Install the whole cavity to the mainframe and secure
with four #8-32 S.S hex nuts to the weld studs on
the corners of the cavity thru the front frame weld as-
sembly.
Figure 15
7. Wrap the cavity with two layers of oven cavity insula-
tion (8) starting from the right side of the oven and
use two wire straps to fasten them down. Once insu-
lated cut away insulation for heating element to exit
from oven cavity.
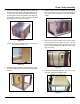
Figure 16
8. Then add the top cavity insulation (11) to the top of
the cavity. It will not be strapped down.
Figure 17