
Operating instructions

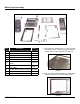

5
InstallatIon
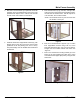
Main Frame Assembly
3. Bolt Rear U-channel frame (3) to split base front/ rear
assembly. There are welded bolts in the corner of the
split base rear. Slip the rear u- channel over the bolts
and use a two nuts to fasten it to the frame.
Figure 4
4. Install the Frame liner support/back channel (5) with
anges facing to the rear of the oven and vent hole
positioned on the left (Viewing from front of oven).
This part will align over two welded slots but will NOT
be fastened.
Figure 5
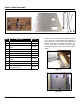
5. Bolt channel frame top (6), left side, and right side,
front to back (7) to the Frame liner support/back chan-
nel and Rear U-channel frame. This will require six
¼-20 hex bolts, two for each member.
NOTE: The backside needs only nuts since the bolts
are welded to each part.
Figure 6
6. Bolt two motor/transformer supports (8) to Frame
liner support/back channel using 5/16”-18, 3-inch
bolts with spacers and two 5/16”-18 nuts per spacer.
Flanges must face inward towards each other. See
“Figure 6”.
7. Bolt on the transformer-mounting bracket (9) to the
bottom of the right (viewing from back end of oven)
motor/transformer support (No picture), using two hex
head screw
Figure 7