
Operating instructions


18
operation
Control and Operating Instructions
2
1
4
5
3
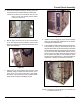
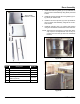
Figure 50
The controls required to operate the oven are listed in the
following table together with a short functional description
of each.
Item Description
1 Thermostat Control - Regulates oven temper-
ature. Controls heating element operation.
2 Thermostat Light - Indicates when the thermo-
stat is calling for heat and the elements are ON.
3 Timer/Constant Heat - Electrical timer to aid
in time cooking cycles. Controls oven and con-
stant heat mode.
4 Power Light - Indicates power is ON.
5 Power/Fan Switch - Three position fan switch.
Controls fan speed either HIGH/LOW or in the
middle position the oven is OFF.
OPERATING INSTRUCTIONS
1. Check that power is available to the oven
2. Arrange shelf positions according to the item to be
cooked.
3. Close doors. Move fan switch to HIGH or LOW. Fan
should come on.
4. Set thermostat dial to desired cooking temperature.
Element indicator light should come on
5. Allow oven to preheat for about 5-10 minutes. Pre-
heating is complete when indicator light goes out and
the buzzer sounds. Do not waste energy by turning
the oven on too early.
6. Load oven. The load should be adjacent to the oven,
so the doors will be open as short a time as possible.
7. Close doors. Set timer for desired cooking time.
8. Buzzer will sound at end of preset interval. Oven is
ready to unload.
9. If oven temperature is to be lowered, set the thermo-
stat to the desired temperature to cool interior. Fan
will continue to run with left door open and right door
closed. Where indicator light comes on, oven is at
lower temperature. Close left door. When light goes
off, oven is ready for use.
10. For daily shutdown, place oven thermostat and pow-
er switch in OFF position. For extended shut- down,
leave doors ajar as well.