Model SC-11 S1 User Guide Stereo Control Amplifier
CAUTION: TO REDUCE THE RISK OF ELECTRIC SHOCK, DO NOT REMOVE COVER (OR BACK) NO USER-SERVICEABLE PARTS INSIDE REFER SERVICING TO QUALIFIED SERVICE PERSONNEL The lightning flash with arrowhead symbol within an equilateral triangle is intended to alert the user to the presence of uninsulated "dangerous voltage" within the product's enclosure that may be of sufficient magnitude to constitute a risk of electric shock to persons.
IMPORTANT SAFETY INSTRUCTIONS READ BEFORE OPERATING EQUIPMENT This product was designed and manufactured to meet strict quality and safety standards. There are, however, some installation and operation precautions which you should be particularly aware of. 1. Read these instructions. 2. Keep these instructions. 3. Heed all warnings. 4. Follow all instructions. 5. Do not use this apparatus near water. 6. Clean only with dry cloth. 7. Do not block any ventilation openings.
~ WARRANTY For warranty information, contact your local Marantz distributor. RETAIN YOUR PURCHASE RECEIPT Your purchase receipt is your permanent record of a valuable purchase. It should be kept in a safe place to be referred to as necessary for insurance purposes or when corresponding with Marantz. IMPORTANT When seeking warranty service, it is the responsibility of the consumer to establish proof and date of purchase. Your purchase receipt or invoice is adequate for such proof. FOR U.K.
CE MARKING CE: CE: CE: CE: CE: Frangais AVERTISSEMENTS a English The SC-11 S1 is in conformity with the EMC directive and low-voltage directive. - Fran~ais Le SC-11 S1 est conforme sur les basses tensions. a la directive EMC et a la directive Deutsch - Das Modell SC-11 S1 entspricht den EMC-Richtlinien und den Richtlinien fOr Niederspannungsgerate. Nederlands De SC-11 S1 voldoet aan de EMC eisen en de vereisten voor laag-voltage.
Nederlands WAARSCHUWINGEN Stel het apparaat niet bloat aan regen, vocht, druppels of spetters. Verwijder de afdekplaat van het apparaat niet. - Duw niets door de ventilatieopeningen in het apparaat. Raak het netsnoer niet met natte handen aan. Bedek de ventilatieopeningen niet met enige voorwerpen, zoals tafelkleden, kranten, gordijnen, enz. Plaats geen brandende voorwerpen, zoals kaarsen, op het apparaat.
Thank you for purchasing this Marantz SC-11 S1 Stereo Control Amplifier. Please read these operating instructions carefully. We recommend that you read the entire user guide before you attempt to connect or operate the player. After you have reviewed the contents of this manual, we suggest that you make all system connections before you attempt to operate the unit. • Checking the accessories After opening the cover of the packing box, check that the following accessories are included.
I [~C_O_N_TE_N_T_S----------~] FEATURES 3 BEFORE USiNG 4 EQUIPMENT MAINS WORKING SETTING .4 COPYRIGHT 4 INAPPROPRIATE PLACES FOR INSTALLATION .4 NAMES AND FUNCTIONS OF PARTS FRONT PANEL. 6 DISPLAY 7 REAR PANEL 8 REMOTE CONTROLLER 9 CONNECTIONS 11 BALANCED JACKS 11 SPEAKER POSITIONING FOR SUPER AUDIO MULTI-CHANNEL SOUND 19 CONNECTING THE POWER SUPPLY 19 BASIC OPERATION PLAyBACK HOW TO USE AND SET FEATURES 2 6 20 20 21 ATT.
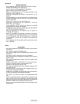
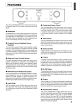
[-----=F-=E=-=----=AT~U=____R_E_S ] _. 0 0 ee _.... "..... '\. rnapan'z "to!' - 0 0 0) ..,... 0 e a • HDAM-SA3 The HDAM-SA3 is an amp module equipped with a new circuit that has further improved stability from the previous HDAM-SA and HDAM-SA2. The HDAM-SA3 is an essential part of this unit's amp module, incorporated into many components such as the current-voltage converter and input buffer.
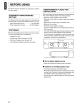
] INAPPROPRIATE PLACES FOR INSTALLATION [ EQUIPMENT MAINS WORKING SETTING Your Marantz product has been prepared to comply with the household power and safety requirements that exist in your area. - Power requirements (U.S.A.) Power requirements (Europe) AC 120V 60Hz AC 230V SO/60Hz To keep your player in perfect working order for the longest possible time, avoid installing the player in the following locations.
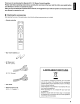
~] [__B_E_F_O_R_E_U_S_IN_G • Loading batteries • Usage of remote controller Before using the remote controller for the first time, load the batteries in the remote controller. The batteries provided are used to verify the operations of the remote controller only. Operational range Operate the unit with the remote controller within the range of the illustration below. 1. Remove the battery cover. 2. Insert the batteries with correct +/- orientation. Remote controller Precautions 3.
II ~] [,--N_A_M_E_S_A_N_D_F_U_N_C_TI_O_N_S_O_F_PA_R_T_S I ( FRONT PANEL ] 11 10 9 7 "----I,:====r-a----"'~ =!="=! (0 POWER ON/OFF Switch 2 This button attenuates the volume with one press of the button. For instructions on How to Set the Attenuation Level, see page. 21. ® Display VOLUME Knob This knob is for setting the volume. The volume level is displayed on the display @. When turned slowly, the volume can be fine-adjusted in O.
[~_N_A_M_E_S_A_N_D_F_U_N_C_T_IO_N_S_O_F_P_'A_R_TS ( DISPLAY J VOLUME Indicator Volume Display Max t . . . i2~. ::; t L HH:.-1 _. 1. Turn the VOLUME knob on the unit to the right, or press the VOLUME A button on the remote controller. ..... i....! '_0' O.5dB Steps LH~E-1 @ Power Indicator This indicator is lit a blue color while power to the unit is ON. Turn the VOLUME knob on the unit to the left, or press the VOLUME ... button on the remote controller. @ Display Panel L I r'iE-1 _.
[ I ] NAMES AND FUNCTIONS OF PARTS ( REAR PANEL H @ @ ACIN lDaranlZ MODEL NO. SC·11S1 @ PHONO GND Terminal Connect the grounding wire from an analog record player here. @ PHONO Input Jacks These jacks are for connecting to an analog record player. Both MC and MM cartridges can be used, therefore set the PHONO MC button ® on the front panel according to the type of cartridge you are using. © CD Input Jacks These jacks are for connecting to the output jacks of a Super Audio CD player, etc.
[~_N_A_M_E_S_A_N_D_F_U_N_C_T_IO_N_S_O_F_P_'A_R_T_S (~R_E_M_O_T_E_C_O_N_T_R_O_L_L_E_R ------------~] ~) . This remote controller can be used to control the SC-11 S1 and Marantz Super Audio CD players or DVD players that have a remote control receptor. The operations possible by remote control may differ with each component, therefore see the instruction manual that came with the component. OJ This button starts the various trim adjustments. (Page. 22) When multiple units are connected by F.C.B.S.
[ I NAMES AND FUNCTIONS OF PARTS ] The buttons in groups [[] and lID are for operating Marantz products other than the SC-11 S1 , such as Super Audio CD players or DVD players. The function of each button changes to match the component selected as the input source from the INPUT SELECT buttons [jJ.
~ o-oC-ne-cO-tio-n-~-xa-~-p-~-s-~-_~-a~-~-e-,~-m-~-le-S-O-fc-o-n-ne-c-tin-g-to-a------------------~] (~B_A_L_A_N_C_E_D_J_A_C_=____K___.:S=____ ~) Marantz SM-11 S1 stereo power amplifier. Refer to these connection examples when connecting to different amplifiers.
[ I ] CONNECTIONS • Connection Example1: Basic Connection for Normal Stereo Playback Connection Example with Input Source Components CD Player Tuner, etc. To LINE OUT jack DVD Player, etc. To LINE OUT jack CD-R, etc. Tape deck, etc. To LINE OUT jack To LINE IN jack To LINE IN jack Record player 7, SC-11S1 @ lDarant; MODEL NO. SC-llS R ch L ch CD player, etc. CD player, etc.
[~_C_O_N_N_E_C_T_IO_N_S ~] Connection example to power amplifier • Set the PRE OUT button on the front panel to ON. To power outlet SC-11 S1 @ @ @ lDarantz MODEL NO. SC·11S1 @ 1r~J.~~~O I!J CJ @ .0 @ @ - - - - - - - Set to STEREO Stereo Power Amplifier SM-11 S1 Set to STEREO To power outlet @ @ ~ @ @ @ @ .
[ I ] CONNECTIONS • Connection Example 2: Stereo Complete Bi-amp Connection CD The two amplifiers are connected by EG.B.S. for synchronized use. For EG.B.S. connection, connect with commercially available monaural Q monaural miniplugs or stereo Q stereo miniplugs as described in F.C.B.S. (page. 26). CIl Set the 10 numbers as explained in HOW TO SET 10 NUMBERS (page. 27). When the 101 amplifier is operated, the 10 2 amplifier will operate in sync. ® Connect the analog output of the GO player etc.
[~_C_O_N_N_E_C_TI_O_N_S ~] CD Player " " ~ _ ""-1-npn·"I& (;]~ " .. ~ _MOOt;'..., ...."a. R f I SC-11S1 for R ch I • Set to 102 AC IN To power outlet ~ @ Set to BI-AMP @ 7 ----+ F.G.B.S. +-- F.G.B.S.
( I CONNECTIONS ] • Connection Example 3: Basic Connection for 5.1 Multi-Channel Playback CD The three units are connected using F.C.B.S. For the F.C.B.S connection, prepare 3 audio connection cables, and refer to F.e.B.S. on page 26. @ Set the 10 numbers for the three amplifiers as explained in HOW TO SET 10 NUMBERS (page. 27). When the 10 1 pre-amp is operated, 102 and 103 pre-amps will operate in sync. G) Connect the outputs of players that have 5.
[~_C_O_N_N_E_C_T_IO_N_S ~] Su er Audio CD Multi-channel Pia er Mum CHANNEL AUDIO OUT @@I 0 > I R 101 0 A 00 @)@)@)@) @ s ) ; I For centerl subwoofer • Set to 10 2 @ @ AC IN To power outlet '""':-:----~~ Set to STEREO @ to page. 18 ------. For center SM-11S1 - - - - Set to STEREO ~ @ ~ @ ti. ~ ~ @ r;=:=:>\ ~.II~, 0 ~ ""-"""_ _ II" SY$TEN2: ._. OHMS ~~To power outlet BTL; • O+1M$ BTL:16QHMS I ~_®»J:.~_@_LCH~ ~ ~ ~ L-.
I[ ] CONNECTIONS From page. 17 -+ I For surround UR I • Set to 10 3 ® @ &L.;p~IG~rn~~~~~~I-'] :~15~ r€[~J£e - ~II I--!I ® _ ACIN pa_g_e~_1_7 __ Fr.. om ...... ® ~~AJ \.. . ~~.,..7 I To power outlet Set to STEREO JI .. EC.B.S.-+ EC.B.S. +-- For surround UR SM·11S1 _ - - - S e t to STEREO ~""':"f'~~,"".== ~ '- ~ ~ r r:STEREO ~ I BTl .- .=1 o ® Ctl ® Surround R ch Speaker 18 . ® ® SYSTEM 1 .m:,:."il8. OR SYSTEM 2 , 4· a OHMS SYSTEM 1 .
~] ['--_C_O_N_N_E_C_T_IO_N_S SPEAKER POSITIONING FOR SUPER AUDIO MULTI-CHANNEL SOUND (CONNECTING THE POWER SUPPLY) 1. Plug the power cable into AC IN jack on the back panel. In order to enjoy Super Audio CD multi-channel sound with the best possible acoustics, it is recommended to position speakers as specified in ITU-R BS.775-1 of the International Telecommunication Union (ITU).
( I ] BASIC OPERATION ( PLAYBACK To explain how to play back input sources, typical examples are given with disc playback from a Super Audio CD player and record playback from an analog record player. Refer to the connection procedures and check that each component is correctly connected to the amplifier. • Disc Playback on a Super Audio CD Player 1. Press the power ON/OFF switch of the Super Audio CD player to activate power to it. 2.
[~H_O_W_TO_U_S_E_A_N_D_S_ET_FE_A_T_U_R_E_S (~S_U_B_SO_N_I_C_F_IL_T_ER ( ATT. (ATTENUATION) ATT. button 0 0 e e 0 t; 00) e 0 1. When the ATT button on either the unit or the remote controller is pressed, "ATT" flashes on the display and the volume level is reduced. When the ATT button is pressed again or the volume is increased/decreased using the controls, the mode is canceled and the original volume level is restored. L I f··H::.-1 2.
I [~_H_O_W_T_O_U_S_E_A_N_D_S_E_T_FE_A_:r_U_R_E_S II ( TRIMMING There are three trimming modes. • LEVEL trimming that adjusts the volume level on left and right channels • BASS trimming that adjusts the bass on left and right channels • TREBLE trimming that adjusts the treble on left and right channels ~] • How to Trim Volume Level The volume level of the left and right channels can be trimmed in 0.5dB steps across a 0.0 - 9.OdB range.
[ H_O_W_T_O_U_S_E_A_N_D_S_E_T_F_E_A_:T_U_R_E_S ------------] • How to Trim Bass • How to Trim Treble The bass level of the left and right channels can be trimmed in 2dB steps across a -8.0 - +8.0dB range. When this unit is shipped from the factory, the bass level is set to 0 dB. To trim the bass level, active tone control by pressing the TONE button on either the unit or the remote controller. The treble level of the left and right channels can be trimmed in 2dB steps across a -8.0 - +8.0dB range.
[ I ] HOW TO USE AND SET FEATURES HOW TO OPERATE THE SIDE ILLUMINATION Illumination Lamp DISPLAY bUJ" I o:~e CO lnapanlZ -- ~ ('-B_I-_AM_P_M_O_DE -0 0) 0 °:0 e -- This unit is equipped with a bi-amp mode to enable a complete bi-amp connection using two SC-11 S1s. This complete biamp connection is a high-end technique for enhancing sound quality, proposed by Marantz.
[ HOWTO USE AND SET FEATURES 2. Afta< completi"g the """ectio"s show" below, switch th] [ REMOTE POWER CONTROL By connecting this unit to a Marantz 8M-11 81 stereo power amplifier by remote power control, the power supply of the 8M-1181 can be automatically switched ON/OFF in sync with this unit's power ON/OFF control. There are 2 trigger output terminals on this unit, and a maximum of 2 8M-11 81s can be controlled in sync with this unit's power ON/OFF control. 1.
I [~_H_O_W_T_O_U_S_E_A_N_D_SE_T_FE_A_:r_U_R_E_S ------~] J ( F.e.B.S. . EC.B.S. (Floating Control Bus System) is a communication system that connects up to four SC-11 S1s over a dedicated bus line so as to enable synchronized operations amongst them via 2-way data communications. Prepare the correct number of portable audio connection cables for the number of units to be connected. Either of the following types of connection cables are adequate.
[~_H_O_W_T_O_U_S_E_A_N_D_S_E_T_F_E_A_:r_U_R_E_S ( HOW TO SET 10 NUMBERS If using this unit by itself as a stereo amplifier, set the 10 number to "0" (Default setting is "0"). ---------~] DISPLAY button ,....-..l==;=c]===~===;;;:;r=6=;=====---, Q e Note: If the 10 number is set to a number other than "0", this unit cannot be used for standalone operation. The 10 number of the unit appears on the display for about 3 seconds after the power is activated. ? L..-+'r"===J_e...l..
I ~y~:~o~~"~e~~~~,~~~~~ ] below checks before thinking the worst. Improper operation can cause the SC-11S1 to behave in a way that makes you think something is wrong with the equipment when actually not. If the trouble cannot be fixed after making the below checks, contact the place of purchase, your nearest Marantz dealer, our customer service center or our repair service center.
~-OW-~-~-I~-ut-~-o~-~_-I~-Ok-~-):r_I_O_N_S_&_D_IM_E_N-~-:-~-~-ns-~-~-s(-~-n~-I:A-mm-W-(in-I~-h)-~-S---] ......................................................2.0V (BALANCED) ................................................ 2.0V (UNBALANCED) N~ ~ ~ Maximum output (20Hz - 20kHz) ....................................................13.5V (BALANCED) .............................................. 13.5V (UNBALANCED) Frequency response (±3dB) ...................................... 5Hz - 120kHz (BALANCED) ......
I ~h.~:~~~~h. ] ca'. a,d rna;,t.'a",. tasks that must be performed to optimize the operation of your Marantz equipment. • Cleaning of equipment external surfaces The exterior finish of your unit will last indefinitely with proper care and cleaning, Never use scouring pads, steel wool, scourging powders or harsh chemical agents (e.g., lye solution), alcohol, thinner, benzine, insecticide or other volatile substances as these will mar the finish of the equipment.
www.marantz.com You can find your nearest authorized distributor or dealer on our website. lTIarantz® is a registered trademark.
_apantz® MARANTZ CANADA LIMITED WARRANTY Marantz Canada ("Marantz") warrants the following Marantz products for the periods indicated: Who May Enforce the Warranty 3·year warranty for both Parts & Labour, from the original purchase date: What We Will Pay For Amplifiers; Pre Amplifiers; Pre Amplifier-Processor-Tuners; Integrated Amplifiers; Tuners; Receivers; DVD Players; CDRecorders; CD Players; Audio Cassette Decks; Learning Remote Control Devices; Universal Dock & DLP front Projectors.
lDapantz® GARANTIE LlMITEE DE MARANTZ CANADA Marantz Canada ("Marantz") garantie les produits suivants pour les periodes indiquees : 3 ans de garantie pour les pieces et la main d'muvre prenant eftet it partir de la date d'achat du produit : Amplificateurs, Preamplificateurs, Pre-ampli-processeurssyntoniseurs; amplificateurs integres, syntoniseurs, recepteurs, lecteurs DVD, enregistreurs CD, lecteurs CD, pIatines a cassette audio, telecommandes programmables, Dock universel et projecteurs avant DLP.
CTEPEO ynPABJIHIOIUIIH YCIIJIIITEJIhl CTEPEO YCIIJIIITEJIh MOIUHOCTII Marantz SC-llSl/SM-llSl (PYKOBO.QCTBO no 3KCnJlYATAI..UI1~) I:P-T ~ ASl 46 Bbl nplllo6pem1 yCTpOItiCTBO YClIIJllllTeJlbHOe/npeo6pa30BaTeJlbHOe npOIll3BO,lJ,CTBa KOMnaHlII1II "D&M XOJl,lJ,IIIHrC V1HK", RnOHIIIA ("D & M Holdings Inc.", Japan).
For U.S.A. lDapantz® Limited Warranty Marantz America, Inc. ("Marantz") warrants the following Marantz Products for the periods indicated: Who may enforce the warranty This warranty may be enforced only by the original purchaser. 1.