Model SA-11S1 User Guide Super Audio CD Player CLASS 1 LASER PRODUCT LUOKAN 1 LASERLAITE KLASS 1 LASERAPPARAT
ENGLISH DEUTSCH WARRANTY For warranty information, contact your local Marantz distributor. RETAIN YOUR PURCHASE RECEIPT Your purchase receipt is your permanent record of a valuable purchase. It should be kept in a safe place to be referred to as necessary for insurance purposes or when corresponding with Marantz. IMPORTANT When seeking warranty service, it is the responsibility of the consumer to establish proof and date of purchase. Your purchase receipt or invoice is adequate for such proof. FOR U.K.
CE MARKING English The SA-11S1 is in conformity with the EMC directive and low-voltage directive. Français Le SA-11S1 est conforme à la directive EMC et à la directive sur les basses tensions. Deutsch Das Modell SA-11S1 entspricht den EMC-Richtlinien und den Richtlinien für Niederspannungsgeräte. Nederlands De SA-11S1 voldoet aan de EMC eisen en de vereisten voor laag-voltage. Español El SA-11S1 está de acuerdo con las normas EMC y las relacionadas con baja tensión.
Español - - Português ADVERTENCIAS No exponga el equipo a la lluvia ni a la humedad. No extraiga la tapa del equipo. No introduzca nada en el interior del equipo a través de los orificios de ventilación. No maneje el cable de alimentación con las manos mojadas. No cubra la ventilación con objetos como manteles, periódicos, cortinas, etc. No deben colocarse sobre el equipo elementos con fuego, por ejemplo velas encendidas.
FOREWORD ........................................ 1 • • EQUIPMENT MAINS WORKING SETTING .. 1 COPYRIGHT ............................................. 1 INTRODUCTION .................................. 1 • • • • PRODUCT FEATURES ............................. 2 ABOUT SUPER AUDIO ............................. 2 PLAYING CD-RW DISCS .......................... 2 • • • PRECAUTIONS ......................................... 3 USING REMOTE CONTROL UNIT ........... 3 LOADING BATTERIES ............................
ENGLISH PRODUCT FEATURES APPLICABLE DISCS TO THE UNIT This unit can playback the outstanding sound performance in Super Audio CD. This unit has the following unique features. • Low-noise low-distortion filter circuit and highspeed current-feedback-type output amplifier with the differential input type HDAM. • Text information display function that can display disc titles, track titles etc. in Super Audio CD. • CD-R/CD-RW discs can be played. 1.
INAPPROPRIATE PLACES FOR INSTALLATION To keep your player in perfect working order for the longest possible time, avoid installing the player in the following locations.
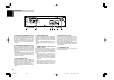
ENGLISH NAMES AND FUNCTIONS FRONT PANEL SUPER AUDIO CD PLAYER SA-11S1 OPEN/ CLOSE PLAY DISPLAY OFF STOP SOUND MODE Ú2 Ú0 z POWER ON/OFF switch This switch is used to turn the power ON and OFF. When it is pressed, the display window lights up, and the power comes on. When it is pressed again, the display window is extinguished, and the power goes off. x Disc tray The disc to be played is placed on the tray. * Close the tray by pressing the operation button, not by pressing it in with your hand.
⁄3 ⁄0 ⁄5 ¤6 ‹2 OPEN/ CLOSE SOUND MODE b DISPLAY TIME TEXT MENU ENTER RECALL SCROLL ⁄4 ¤0 INPUT AMP VOLUME ‹3 ⁄8 , ⁄9 QUICK REPLAY AMS A-B REPEAT PROG CANCEL RANDOM 1 2 3 4 5 6 7 8 9 ¤7 ¤5 ¤3 PAUSE button , STOP button This button is for repeat play. Each time this button is pressed, repeat mode changes as follows. “All Repeat” → “Track Repeat” → “Repeat Off” (See page 11) .
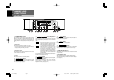
ENGLISH REAR PANEL A B CDE F G A ANALOG OUTPUTS UNBALANCED connectors D DIGITAL AUDIO OUT OPT. F EXT./INT. (Ext./Internal switch) These are the unbalanced output jacks of the analog audio signals. The supplied analog connection cord can be connected to the CD, AUX, or other connectors on an amplifier. Be sure to connect the L and R channels correctly to the corresponding jacks. * Never connect to the PHONO connector on the amplifier. It outputs the playing Audio CD signal in digital format.
ENGLISH DISPLAY c d e fgh i j a k l mn o pq b a Main display g TRK (track) indicator n N SHP (noise shaper) indicator The time display and text information of the disc to be played as well as the setting menus and other displays appear on the main display. This lights above the display of the track number now playing, for instance. This lights when the noise shaper is turned on.
ENGLISH CONNECTIONS Depending on your amplifier/receiver/Stereo System, there are various ways to connect to this player. For correct connection please refer to instruction manuals of stereo system to be connected. Caution: Do not connect output from this unit to PHONO input of your audio system. 1. Connect the audio cable q to this unit’s front speaker outputs and the stereo inputs on your amplifier, receiver or stereo system. 2.
Press To stop playback * In this instruction manual, some operations can only be performed with the remote control. For operations that can be performed with buttons both on the main unit and on the remote control, the button names are shown in the mark. And for operations that can only be performed with buttons on the remote control, the button names are shown in the mark. CONNECTING THE POWER SUPPLY 1 Plug the power cable into AC IN jack on the back panel. q Press POWER switch to turn on.
ENGLISH START SOUND MODE When a Super Audio CD hybrid layer discs that has both a Super Audio CD high sound quality stereo area and an Audio CD area information are to be played, this player makes it possible to set the layer/ area (Super Audio CD or Audio CD) to be preferentially played. This setting can be made when the tray is closed and there is no disc in the disc tray. q Press SOUND MODE button on the player. The currently selected layer/area is displayed.
REPEATED DISC PLAY (REPEAT PLAY) PLAYING TRACKS IN A RANDOM SEQUENCE (RANDOM PLAY) PLAYING TRACKS IN A SPECIFIC SEQUENCE (PROGRAM PLAY) SPECIFY TRACK NUMBER TO PLAY (DIRECT SEARCH) ALL TRACK REPEAT When RANDOM button on the remote is pressed in stop mode, and then PLAY button is pressed, the unit shuffles track order automatically and plays all the tracks in the shuffled order. The RNDM (random) indicator lights. • The gap between tracks will be approximately 2 seconds during random play.
ENGLISH To Check the Programmed Tracks Press the RECALL/SCROLL button on the remote control during the program or when the program is stopped (“PROG” lights up). Every time press RECALL/SCROLL button, the programmed tracks will be displayed one after the other in order. QUICK REPLAY Q&A • How many tracks can be programmed? Up to 30 tracks can be programmed for program play.
Changing procedure (Changes can be made from the main unit when operation is stopped.) STOP q If playback is in progress, press the button to stop playback. w Hold down the PAUSE button on the main unit for at least two seconds. (This operation does not work on the remote control.) After holding down the button for two seconds, the current contrast value is displayed. Within two seconds while it is displayed, press the button to increase the contrast, or press the button to reduce the contrast.
ENGLISH TROUBLE SHOOTING If you think a malfunction has occurred, first check the points listed below. The problem is likely to have been caused by a simple operational error or a connection problem. If the problem cannot be corrected even after carrying out the following checks, consult your dealer or nearest Marantz sales office or service counter. • 1. 2. 3. 4. 5. 6. 7. The disc fails to rotate.
www.marantz.com You can find your nearest authorized distributor or dealer on our website. JAPAN Marantz Japan, Inc. 35-1 Sagami Ohno 7-Chome, Sagamihara-shi, Kanagawa 228-8505, Japan U.S.A. Marantz America, Inc. 1100 Maplewood Drive, Itasca, IL 60143, U.S.A. EUROPE Marantz Europe B.V. P.O. Box 8744, 5605 LS Eindhoven, The Netherlands is a registered trademark. Printed in Japan SA-11S1N(Cover) 08/2004 00M18AK851310 ecms-b Page 4 04.8.3, 5:16 AM Adobe PageMaker 6.