Model PMD570 User Guide Solid State Recorder ®
Warnings and Cautions CAUTION RISK OF ELECTRIC SHOCK DO NOT OPEN CAUTION: TO REDUCE THE RISK OF ELECTRIC SHOCK, DO NOT REMOVE COVER (OR BACK) NO USER-SERVICEABLE PARTS INSIDE REFER SERVICING TO QUALIFIED SERVICE PERSONNEL The lightning flash with arrowhead symbol within an equilateral triangle is intended to alert the user to the presence of uninsulated "dangerous voltage" within the product's enclosure that may be of sufficient magnitude to constitute a risk of electric shock to persons.
Important Safety Instructions READ BEFORE OPERATING EQUIPMENT This product was designed and manufactured to meet strict quality and safety standards. There are, however, some installation and operation precautions which you should be particularly aware of. 1. Read Instructions – All the safety and operating instructions should be read before the product is operated. 2. Retain Instructions – The safety and operating instructions should be retained for future reference. 3.
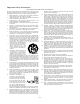
WARNINGS ANTENNA LEAD IN WIRE GROUND CLAMP ELECTRIC SERVICE EQUIPMENT GROUND CLAMPS Do not expose the equipment to rain or moisture. ANTENNA DISCHARGE UNIT (NEC SECTION 810-20) GROUNDING CONDUCTORS (NEC SECTION 810-21) Do not remove the cover from the equipment. Do not insert anything into the equipment through the ventilation holes. Do not cover the ventilation with any items such as tablecloths, newspapers, curtains, etc.
CE marking (only EU version) English This product is in conformity with the EMC directive and low-voltage directive. Français Cet appareil est conforme á la directive EMC et á la de directive sur les basses tensions. Deutsch Dieses Greät entspricht den EMC-Richtlinien und den Richtlinien für Niederspannungsgeräte. Nederlands Dit apparaat voldoet aan de EMC-richtlijnene en de richtlijnen vooor apparatuur met laag voltage.
Table of Contents Precautions Warnings and Cautions ................................... Important Safety Instructions ......................... Regulatory Compliance .................................. Table of Contents ................................................. Package Contents ................................................. CF card ................................................................ Introduction ......................................................... Features .......................
Package contents TrkMkERASE .................................................. 41 AllMkERASE ................................................... 42 FORMAT (CF card) ......................................... 42 To FORMAT a CF card ................................. 42 I/O port ................................................................ 43 How to connect via the I/O port ....................... 43 Diagram of file structure .................................. 43 EDL marks ...................................
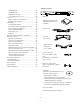
Introduction Thank you for selecting the Marantz Professional PMD570 Solid State Recorder. The PMD570 is an audio recorder that records in digital audio formats onto a Compact Flash™ memory card (CF card) or Microdrive™. Audio outputs may be from: • headphones connected to the HEADPHONE jack, • analog audio devices such as an amplifier or other device connected to the ANALOG OUT jacks, and/or • digital audio devices using SPDIF format connected to the DIGITAL OUT jack.
• Tracks • A new track (file) is automatically started each time you begin a recording. • It is not possible to record over a previously recorded track unless it is first erased. • An Auto Track feature can add tracks every minute or other selectable recording interval. (Minute track: Setting the interval to one minute provides a new track every minute of a recording, permitting navigating a large audio recording by time.) • A new track can be started during recording by pressing the Record button.
Basic installation and start-up DIGITAL IN OUT Follow the instructions on this page to install your new PMD570 Solid State Recorder and begin recording. (SPDIF) The PMD570 comes factory preset (Preset1) for recording in stereo with MP3 compression, recommended quality for music recording. INPUT Connect a SPDIF coaxial digital audio cable to DIGITAL IN and/or DIGITAL OUT and then to output and/or input of your digital device. DIGITAL OUT signal is available while playing, recording or in record pause.
Basic installation and start-up continued 2. The Card eject button has two positions: click out (a) and click in (b). Leave or push the Card eject button so it is in the in (b) position. 6b. RS-232C host equipment. R BALANCED L IN ANALOG GROUND 1 2 DIGITAL L 3 HOT (+) AC IN RS 232C REMOTE2 I /O UL US LISTED C REMOTE1 OUT + 24 IN OUT RS 232C Full control and setup of the PMD570 is available via RS-232C external control. 3. Insert a CF card. See page 47 for RS-232C control codes.
Basic installation and start-up continued b Example display All Preset default settings are outlined on page 51. [A 128MB CF card can record about 1 hour and 45 minutes at Preset1 default settings. See table on page 51.] TRACKTIME 1 2 SOLID STATE RECORDER PMD570 HEADPHONE LEVEL 0 10 POWER ON/OFF 5. When correct push and release the Jog Wheel. Display returns to Input flashing.
Controls and Connections Front continued SOLID STATE RECORDER PMD570 POWER ON/OFF HEADPHONE MENU/STORE DISPLAY TOTAL TRACKTIME REC REMAIN kbps LEVEL LOCK SHIFT TRACK MARK 0 3. Push and release the Card eject button so it is in click out position (a). 4. To eject the card, push the Card eject button from the click out position to the click in position (b). A-B REC LEVEL/SELECT L kHz-dB AM R PM 00 20 40 1 2 6 2 S.SKIP 0 over EDIT UNDO MARK CANCEL M.
Controls and Connections Front continued SOLID STATE RECORDER PMD570 POWER ON/OFF HEADPHONE The first push of the DISPLAY button switches to remaining record time for the card. 5 TOTAL TRACKTIME REC REMAIN kbps REC LEVEL/SELECT A-B L kHz-dB AM R PM LOCK SHIFT 00 TRACK MARK 0 The second push switches to file parameters. MENU/STORE DISPLAY LEVEL 40 20 1 2 6 2 S.SKIP 0 over EDIT UNDO MARK CANCEL M.
Controls and Connections Front continued 7. A-B label A- indicates that the beginning (A point) of an AB loop has been set. A-B indicates that the ending (B point) of an A-B loop has also been set. 6 SOLID STATE RECORDER PMD570 POWER ON/OFF HEADPHONE MENU/STORE DISPLAY TOTAL TRACKTIME REC REMAIN kbps LEVEL REC LEVEL/SELECT A-B L kHz-dB AM R PM LOCK SHIFT TRACK MARK 0 00 40 20 1 2 6 2 0 over EDIT UNDO MARK CANCEL M. RESET -dB S.SKIP PUSH ENTER LINE 10 MARK REC BAL 8.
Controls and Connections Front continued SOLID STATE RECORDER PMD570 POWER ON/OFF HEADPHONE MENU/STORE DISPLAY TOTAL TRACKTIME REC REMAIN kbps LEVEL REC LEVEL/SELECT A-B L kHz-dB AM R PM LOCK SHIFT TRACK MARK 0 21. Pause icon The Pause icon appears when the PMD570 is in playback pause, or record pause. 6 00 40 20 1 2 6 2 S.SKIP 0 over EDIT UNDO MARK CANCEL M. RESET -dB PUSH ENTER LINE 10 MARK REC BAL 22. S.SKIP label The Silent Skip label appears when Silent Skip is enabled.
Controls and Connections Front continued SOLID STATE RECORDER PMD570 POWER ON/OFF HEADPHONE 7 MENU/STORE DISPLAY TOTAL TRACKTIME REC REMAIN kbps LEVEL A-B LOCK SHIFT REC LEVEL/SELECT L kHz-dB AM R PM TRACK MARK 0 MENU/STORE EDIT 00 40 20 1 2 6 2 S.SKIP 0 over EDIT UNDO MARK CANCEL M. RESET -dB PUSH ENTER LINE 10 MARK REC BAL 7. MENU/STORE EDIT button There are two Menu selections Menu and EDIT Menu 7a.
Controls and Connections Front continued SOLID STATE RECORDER PMD570 POWER ON/OFF HEADPHONE 8 TOTAL TRACKTIME REC REMAIN kbps LOCK SHIFT A-B REC LEVEL/SELECT L kHz-dB AM R PM TRACK MARK 00 40 20 1 2 6 2 S.SKIP 0 over EDIT UNDO MARK CANCEL M. RESET -dB 8d M. RESET button During record, record pause or M. RESET playback push and hold the SHIFT button and push and release the M. RESET button to reset the peak level margin.
Controls and Connections Front continued SOLID STATE RECORDER PMD570 POWER ON/OFF HEADPHONE LEVEL 9 TOTAL TRACKTIME REC REMAIN kbps A-B LOCK SHIFT REC LEVEL/SELECT L kHz-dB AM R PM TRACK MARK 0 How to adjust record balance First check or adjust the record level (above). Push and hold SHIFT while you turn the Jog Wheel to set or adjust the record balance during recording or in record pause. MENU/STORE DISPLAY 00 40 20 1 2 6 2 S.SKIP 0 over EDIT UNDO MARK CANCEL M.
Controls and Connections Front continued SOLID STATE RECORDER PMD570 POWER ON/OFF HEADPHONE EDL marks are numbered consecutively starting at 1 up to a maximum of 255 EDL marks per CF card. MENU/STORE DISPLAY TOTAL TRACKTIME REC REMAIN kbps LEVEL A-B LOCK SHIFT REC LEVEL/SELECT L kHz-dB AM R PM TRACK MARK 0 00 40 20 1 2 6 2 S.SKIP 0 over EDIT UNDO MARK CANCEL 10 10 During playback EDL marks are silent and during EDL Play, do not result in a pause or audio gap. M.
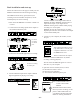
Trim L & R You can use a small screwdriver to adjust the Trim of the XLR L & R inputs. Back pin out R 1 2 BALANCED 1 IN L GROUND ANALOG L 3 HOT (+) 2 DIGITAL IN AC I /O REMOTE2 RS 232C C REMOTE1 UL US LISTED + 24 REF=+16dBu/0dBFS OUT CAUTION R IN OUT RISK OF ELECTRIC SHOCK DO NOT OPEN (SPDIF) R AC120V 60HZ 0.5A 69 FM + 24 IN MODEL NO. PMD570 AUDIO SYSTEM COLD (-) REF=+16dBu/0dBFS L The Trim is factory preset at +16 dBu with an adjustment range from 0 to +24 dBu.
Back continued 2 R 1 2 BALANCED IN L GROUND ANALOG L 3 HOT (+) 3 4 DIGITAL IN AC I /O REMOTE2 RS 232C C REMOTE1 UL US LISTED AUDIO SYSTEM COLD (-) + 24 REF=+16dBu/0dBFS OUT CAUTION R IN OUT RISK OF ELECTRIC SHOCK DO NOT OPEN (SPDIF) IN MODEL NO. PMD570 AC120V 60HZ 0.5A 69 FM + 24 is flashing. 6. Turn the Jog Wheel so Dig-In is flashing. 7. Push and release the Jog Wheel to accept the DigIn choice. 8. Push and release the MENU/STORE button to store the Menu change.
Back continued 6 R 1 2 BALANCED IN GROUND L ANALOG L 3 HOT (+) 7 DIGITAL IN AC I /O REMOTE2 RS 232C C REMOTE1 UL US LISTED AUDIO SYSTEM COLD (-) 69 FM + 24 + 24 REF=+16dBu/0dBFS OUT CAUTION R IN RS 232C OUT EDL Mark During record or playback close to add an EDL mark. 8 RISK OF ELECTRIC SHOCK DO NOT OPEN (SPDIF) IN MODEL NO. PMD570 AC120V 60HZ 0.5A Manual TRK During recording, close to increment the track. A new track is created at that point. There is no break in recording.
Bal.In, UnBal., Dig-In 2003 - 2099 JAN - DEC 1 - 31 AM/PM 0:00 - 11:59 M/D/Y, D/M/Y Stereo/Mono PCM/MP2/MP3 16/22.05/24/32/44.
Preset defaults The default Menu settings for Presets 1, 2 and 3 can be restored by the Default Menu choice, page 39. 1 SOLID STATE RECORDER PMD570 POWER ON/OFF HEADPHONE LEVEL MENU/STORE DISPLAY TOTAL TRACKTIME REC REMAIN kbps A-B LOCK SHIFT REC LEVEL/SELECT L kHz-dB AM R PM TRACK MARK 0 Preset1 default uses the unbalanced (ANALOG IN RCA jacks), line level, inputs. It is set for stereo channel music recording with MP3 compression.
How to set or change the Date and time The date and time are written on each audio track (file) when the track is started. When an audio track is viewed on a computer this date and time appears as when the file was 'modified'. (US Date Form is illustrated.) 1. From stop push and release the MENU/STORE button. 2. Turn the Jog Wheel to select Preset1, 2 or 3. Example display 12. With the hour flashing turn the Jog Wheel to tab through hours. AM, PM will change when you pass 12, check that it is correct. 13.
How to set or change the Date Form The date form is the date order month/day/year or day/month/year. The US default is M/D/Y (month/day/year). The Europe default is D/M/Y (day/month/year). 1. From stop push and release the MENU/STORE button. 2. Turn the Jog Wheel to select Preset1, 2 or 3. 3. Push and release the Jog Wheel to accept the selected Preset. 4. Turn the Jog Wheel so Date Form is displayed and flashing. Example display 5. While Date Form is flashing, push and release the Jog Wheel.
RecFormat The PMD570 can record in a variety of compression algorithm, associated bit rate, file format, and recording type (channels recorded) parameters. See explanations and chart below. File Format The file format (3 character computer file extension) can be .wav, .bwf, .mpg or .mp3. Broadcast Wave format, used primarily in the broadcast industry, includes identification codes in the file header. First determine the input connection you want to record from; BALANCED IN, ANALOG, or DIGITAL IN.
How to set or change the RecFormat parameters Mono, will be displayed and flashing. (Col. 2) This table of RecFormat parameters reflects the menu setting procedure of those parameters. 1 Example display kbps kHz Bal.In, Unbal. or Dig-In 2 3 PCM MP2 Stereo MP3 PCM MP2 Mono MP3 4 5 - - - (1536) 48 - - - (1412) 44.1 - - - (1024) 32 - - - (768) 24 22.05 - - - (704) - - - (512) 16 48 44.1 384,256,192,128,96,64 32 48 44.1 320,256,160,128,80,64 32 24 22.
How to set or change the RecFormat parameters continued 1 Pushing and releasing the Jog Wheel with bwf selected switches to the column 7 default (wav). Turn the Jog Wheel to switch between .wav and .bwf. Bal.In, Unbal. or Dig-In 2 3 PCM MP2 Stereo MP3 PCM MP2 Mono MP3 4 5 - - - (1536) 48 - - - (1412) 44.1 - - - (1024) 32 - - - (768) 24 22.05 - - - (704) - - - (512) 16 48 44.1 384,256,192,128,96,64 32 48 44.1 320,256,160,128,80,64 32 24 22.05 320,256,160,128,80,64 16 - - - (768) 48 - - - (705.
Pre Record When PreRecord is on and the PMD570 is in record pause, it 'listens to' the selected audio input(s) and continuously buffers 2 seconds of audio. When recording begins the 2 second pre record buffer is written at the beginning of the new track. The 2 seconds give you time to precisely start recording without missing the first seconds of audio. Default setting is Off. Auto Mark The Auto Mark Menu item turns the automatic EDL mark feature on or off. See page 19 to manually add EDL marks.
Manual TR Auto Trk When Manual track incrementing is On, during recording push and release the Record button to increment the track. A new track is created at that point. A slight break can be heard during playback. See Seamless Play, page 33, to eliminate the audio break during playback. With Auto Trk (Automatic Track incrementing) On, new track is begun automatically at specified intervals of recording time.
5. While Auto Trk is flashing, push and release the Jog Wheel. The On or Off will be flashing. SeamlsPly (Seamless Play) 6. Turn the Jog Wheel to toggle between On and Off. Example display 7. When correct, push and release the Jog Wheel. The display switches to time interval flashing. Example display 8. Turn the Jog Wheel to tab through the time interval choices (1, 5, 10, 15, or 30 minutes, or 1, 2, 6, 8, 12, or 24 hours). When correct, push and release the Jog Wheel.
SilentSkp (Silent Skip) 8. Turn the Jog Wheel to tab through the silent time interval choices (1 - 5 seconds). Silent skip automatically pauses recording when there is a period of silence and resumes recording when sound resumes. Sometimes this feature is referred to as voice activated recording. Silent Skip looks for sound below a preset level for a preset period of time. When that occurs the PMD570 switches to record pause. When a signal of about -30 dB is input recording resumes.
Auto Cue 8. Turn the Jog Wheel to tab through milliseconds (05 - 95 milliseconds). Auto Cue skips the silence at the beginning of an audio track and pauses playback at the point where the audio begins (sound is loud enough for long enough). You can adjust how loud (how many dB) and how long (milliseconds) the audio has to be before playback is cued. When correct, push and release the Jog Wheel. The display switches to -dB flashing.
Play Mode Play Mode lets you choose what happens when the end of a track is reached during playback. Normal When playback reaches the end of a track it automatically begins the next track until all tracks on the CF card have been played. After the last track on the CF card, playback stops. The PMD570 returns to stop mode. Repeat All During playback all tracks are repeated.
EDL Play The EDL Play menu turns EDL Play On or Off. (or push and release the Stop CANCEL button to cancel all changes). Off PMD570 playback does not respond to EDL mark instructions. Display returns to stop mode. On PMD570 follows EDL mark instructions regarding playback order, skipping sections of recording on the memory card, or repeating (EDL A-B repeat) a section of recording on the memory card. See page 45.
settings: StartPause, StrtPausTR, EDL Mark, and Manual TRK. 6. Turn the Jog Wheel to tab through numbers (and alphabetic characters). Example display Example display 7. When correct, push and release the Jog Wheel. The display returns to Remote flashing. 7. When correct, push and release the Jog Wheel. The number position will be flashing. 8.
EXECUTING will be displayed for a couple of seconds while the default is being written. Default (Menu Default) The Default menu choice resets all Menu (not Edit Menu) items in the Preset to their default values. This is handy if you are setting up a new Preset configuration because you don't have to check all the settings, you know they are at the default. The display will briefly display Done. Note: Putting any Preset to its default also resets the main clock.
Renumber (tracks) If you have erased tracks from the CF card it can be easier to locate recordings if the tracks are renumbered. 1. Select the Renumber EDIT Menu choice: 2. While Renumber is flashing (for about 3 seconds) turn the Jog Wheel until TrkERASE is flashing. While in stop, push and hold the SHIFT button while you push and release the MENU/STORE button. Renumber is displayed and flashing. 3. Push and release the Jog Wheel while TrkERASE is flashing (for about 5 seconds).
AllMkERASE AllMkERASE erases all EDL marks on the CF card. TrkMkERASE TrkMkERASE lets you erase all EDL marks of the selected track. 1. Select the AllMkERASE Edit Menu choice: 1. Select the TrkMkERASE Menu choice: While in stop, push and hold the SHIFT button while you push and release the MENU/STORE button. Renumber will appear (flashing) in the display. While in stop, push and hold the SHIFT button while you push and release the MENU/STORE button. Renumber will appear (flashing) in the display. 2.
FORMAT (CF card) Formatting a CF card erases all audio files on the card and prepares it for use in the PMD570. 4. While FORMAT OK? is flashing press and release the Jog Wheel to confirm. (Or press and release to cancel.) the STOP button The CF card formats used by the PMD570 are Windows compatible. You can copy audio files using a Windows compatible computer* that can read a CF card or be connected via the I/O port. EXECUTING will be displayed and progress to 100%.
How to connect via the I/O port PMDEdit is a full featured software suite designed for Marantz Professional digital recorders available for purchase at www.d-mpro.com. What will appear on your computer is a file titled PMD670.EDL* and a folder (directory) titled MPGLANG1. Files within the MPGLANG1 folder are numbered from 1001 through the number of tracks recorded to a maximum of 1999. The file extension will be .mp3, .wav, .bwf or .mpg depending on the RecFormat parameters that were set for the recording.
EDL marks EDL* (Edit Decision List) marks help you locate specific points in the recording. Locating EDL Marks From stop or play pause push and hold the SHIFT button while you turn the Jog Wheel to scroll through the EDL marks on the CF card. During regular playback EDL marks are silent. *The EDL marking system is proprietary to Marantz Professional solid state recorders. EDL marks can be created during recording manually or automatically.
How to Edit EDL marks: EDL mark types All EDL marks are initially entered as 'Point' marks. Point Nothing happens during EDL playback. From stop or play pause, push and hold the SHIFT button while you turn the Jog Wheel to tab through the EDL marks. Example display TRACKTIME L -dB R 00 20 40 12 6 0 2 over -dB The skipped EDL audio is not erased. The recording is still on the CF card. The skipped EDL recording will play if EDL Play is at Off. You can change the EDL mark type later.
RS-232C Control Windows Application • • • • • An RS232 Windows Application for the PMD570 is available for free download (see www.d-mpro.com to download). The Application lets you control and setup the PMD570 from your PC. Connect your Windows compatible computer to the PMD570 via the REMOTE RS-232C connector on the PMD570 to your computer's RS-232C port. Install the software on your computer.
RS-232C control Connect a male (D-Sub 9 Pin) to female (D-Sub 9 Pin) straight cable for RS-232C external control by host equipment. • The RS-232C host can control functions of the PMD570 externally • The PMD570 automatically transmits status data when status is changed. • The PMD570 will respond to status requests by transmitting the associated status data.
Hand shake flow charts for control commands Control command codes Host sends a command that causes a change in PMD570 status. The control command packets have a data length of 7~10 bytes. ASCII codes from 0x00 to 0x7f are used to receive serial data. At the transmission end, take steps to convert the ASCII codes into HEX data to set the data in the data packets. CR (0x0d) is added as the data packet delimiter.
Table of Control command codes continued M.Level (XX) ............................. “@0CLXX” + CR Play Mode* Normal ........................................ “@0PMOF” + CR Repeat All ................................... “@0PMAL” + CR Repeat TRK ................................ “@0PMAR” + CR Single .......................................... “@0PMSP” + CR EDL Play* ON ........................................... “@0EP00” + CR OFF ........................................... “@0EP01” + CR Remote* StartPause ......
Table of Status Request and Status Information codes: Balanced ......................................................... “@0INBA” + CR Digital In ........................................................ “@0INDI” + CR Date Form ........................................................... “@0?DF” + CR M/D/Y ............................................................ “@0DFDM” + CR D/M/Y ............................................................ “@0DFMD” + CR RecFormat Channels ....................
- 51 - mono 2:13:00 4:26:00 8:52:00 17:44:00 23:33:08 35:28:00 70:56:00 141:52:00 283:44:00 mono 0:16:40 0:33:20 1:06:40 2:13:20 2:57:05 4:26:40 8:53:21 17:46:42 35:33:24 32 MB 64 MB 128 MB 256 MB 340 MB 512 MB (1 GB) 1024 MB (2GB) 2048MB (4GB) 4096MB 16 kHz fs PCM 32 MB 64 MB 128 MB 256 MB 340 MB 512 MB (1 GB) 1024 MB (2GB) 2048MB (4GB) 4096MB stereo 0:08:20 0:16:40 0:33:20 1:06:40 1:28:33 2:13:20 4:26:41 8:53:21 17:48:42 stereo 1:06:30 2:13:00 4:26:00 8:52:00 11:46:34 17:44:00 35:28:00 70:56:00 1
Troubleshooting Should faults occur, it is in many cases not necessary to consult your dealer or technical service department. On the basis of the following checks, you will be able to rectify a number of conditions yourself without difficulty. If the condition cannot be remedied after the following check, please consult your dealer or contact Marantz Professional at 630 741 0330.
Specifications1 Digital audio system System .................................................. Solid State Recorder Usable Media ............................................. CF memory cards (Microdrive) cards Recording and media methods .mp2 ................................ MPEG1 Layer II compression .mp3 ............................... MPEG1 Layer III compression .mp3 ............................. MPEG2 Layer III compression* *for all half sample rates. PCM ................................................
Limited Warranty Your Marantz Professional product is warranted against manufacturer defects in material and workmanship for a period of two years parts and labor. 2. Except as specified below, this warranty covers defects in material and workmanship. The following are not covered under warranty: 3. 1. Damage, deterioration, malfunction or failure to meet performance specifications resulting from: a) Accidents, acts of nature, misuse, abuse, neglect or unauthorized product modification.
® Marantz is a registered trademark.