
Installation Guide


Installation with MAPEI's Reinforcing Fabric:
1. Provide for expansion and control joints as specified
per TCNA Method EJ171 or TTMAC Specification Guide
09 30 00 Detail 301EJ. Do not cover expansion joints
with mortar.
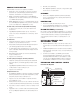
2. If waterproofing integrity is required in expansion and
control joints, provide per the above drawing. MAPEI’s
Reinforcing Fabric or Mapeband can be embedded into
the Mapelastic AquaDefense liquid, allowed to dry and
filled with appropriate joint sealant or an expansion
molding system.
3. Protect tilework with metal strips (edge metal) along both
edges of structural building expansion joints.
Contact MAPEI’s Technical Services Department for more
information.
OPTIONAL USE OF MAPEI’S
REINFORCING FABRIC
Select fabric size (see packaging chart)
• For coves (floor/wall intersections), allow for 2" (5 cm)
of fabric on the floor and 4" (10 cm) up the wall. For
cracks, control joints and vertical corners, allow for 3"
(7,5 cm) of fabric on each side.
• For drains, cut desired fabric size from 38" (97-cm) wide
roll. For floor or wall penetrations, use 6" (15-cm) wide,
38" (97-cm) wide or a combination of both.
• For large areas, the 38" (97-cm) wide roll is recommended.
Cut fabric to size
• Cut all required pieces. Set aside.
Pre-treat cracks, control joints, corners, coves,
drains, and oor and wall penetrations
1. Apply Mapelastic AquaDefense as described in the
“Pre-treat” sections above.
2. Lay pre-cut pieces of fabric into wet Mapelastic
AquaDefense. Use brush to press fabric into corners
until liquid comes through fabric. Work out any wrinkles
or bubbles.
3. While fabric is wet, apply additional Mapelastic
AquaDefense over fabric until completely covered to
create void-free surface. Let dry to a dark-green color.
4. Apply a second coat and let dry.
Install fabric on main area
1. Apply the first coat of Mapelastic AquaDefense
(including areas previously coated) using a 3/8"
(10-mm) nap roller.
2. Place fabric into wet liquid on the floor. Using a roller,
apply pressure to the fabric, working out wrinkles or
bubbles while forcing Mapelastic AquaDefense to come
through the fabric. Overlap seams and ends of the fabric
by 2" (5 cm). While still wet, apply additional Mapelastic
AquaDefense over the fabric until completely covered,
creating a void-free surface. Let dry completely to a dark-
green color.
3. Apply a second coat of Mapelastic AquaDefense to the
entire area. Let dry.
4. Give a final inspection, looking for pinholes, areas not
completely covered and other defects.
5. Recoat as needed. Let dry to a dark-green color.
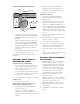
6. Apply a bead of commercial-grade silicone or urethane
sealant between the membrane and the drain flange,
about 1/2" (12 mm) in from the drain opening.
7. Bolt the drain collar into place while the sealant is still
fresh.
8. Install ceramic tile or natural stone per the above section
“Installing ceramic tile or natural stone.”
OPTIONAL USE OF MAPEBAND
ACCESSORIES
1. MAPEI’s Mapeband accessories (cove roll and drain
flashing) are waterproof, vapor-proof thin, elastic,
deformable, rubber-coated fabric pieces that are fully
compatible with Mapelastic AquaDefense and provide
the ultimate in “change-of-plane” waterproofing
protection for coves, corners and drains. Mapeband
accessories are ideal for environments requiring
waterproofing but also where temperature extremes,
freeze/thaw conditions, vibrations, etc., can cause
waterproofing problems.
2. Mapeband cove roll can be used in place of MAPEI’s
Reinforcing Fabric on coves, corners and control joints.
The “felt side” should face into the corner.
3. Mapeband drain flashing can be used in place of
MAPEI’s Reinforcing Fabric on drains. The “felt side”
should face down.
4. See Mapeband ’s Technical Data Sheet for installation
details.
Sealant
(depth is 1/2 width)
Rounded backup
(with no bond to sealant)
Bond
coat
Compressible
backup
Tile
Mapelastic AquaDefense
Bond-breaker tape
Concrete floor
MAPEI’s Reinforcing Fabric