
Installation Guide


PRODUCT APPLICATION
Read all installation instructions thoroughly before installation.
• Fill all cracks, control joints and gaps in corners and coves that are
greater than 1/32" (1 mm) with an appropriate filler material. Force
material into crack and finish smooth with trowel. Let dry.
• MAPEI’s optional Reinforcing Fabric may be used with Mapelastic
AquaDefense in any of the areas shown below (see the section “Optional
Use of MAPEI’s Reinforcing Fabric”).
• MAPEI’s Mapeband accessories (cove roll and drain flashing) also may
be used with Mapelastic AquaDefense in any of the areas shown below
(see the section “Optional Use of Mapeband Accessories”).
Pre-treat cracks, corners and coves (oor/wall intersections)
1. For expansion and control joints, see the section “Expansion and
Control Joints.”
2. Apply Mapelastic AquaDefense liquid 6" (15 cm) on both sides of
cracks, corners and coves with a paintbrush or roller. Let dry to a dark-
green color.
3. Apply a second coat and let dry.
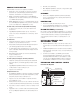
Pre-treat drains
1 Review drain manufacturer’s instructions for waterproof membrane
installation in conjunction with these instructions.
2. Fill space between drain pipe and substrate with appropriate expansion
joint materials (typically foam backer rod and sealant).
3. For drains with bolt-down collar and weep holes, loosen and remove
bolts from drain flange. Abrade drain flange with sandpaper, and clean
and dry thoroughly.
4. With paintbrush, apply a liberal coat over and around drain flange.
Let dry to a dark-green color.
5. Apply a second coat and let dry.
Pre-treat openings around pipes and other penetrations
1. Pack/fill the openings/spaces between drain pipe and substrate with
appropriate expansion joint materials (typically foam backer rod and
sealant).
2. Apply Mapelastic AquaDefense with brush around and up onto floor
or wall penetration. Let dry to a dark-green color.
3. Apply a second coat and let dry.
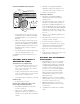
Complete the main area
1. Apply Mapelastic AquaDefense to entire area to be waterproofed (including
previously coated areas such as cracks, drains and penetrations) using a
3/8" (10 mm) nap roller. Let dry to a dark-green color.
2. Apply a second coat to entire installation. Let dry 30 to 50 minutes
before installing tile or stone.
3. Final dry thickness of first and second coats combined in the main area
should be about 20 mils at minimum (about the thickness of a credit card).
4. Inspect and, as needed, recoat pinholes or areas not completely covered.
Let dry.
5. Apply bead of silicone or urethane sealant around drain flange at drain
throat to join Mapelastic AquaDefense to the drain assembly. Leave no
voids.
6. Bolt down collar to drain flange.
7. Where Mapelastic AquaDefense coating ends on any penetration, apply
a bead of silicone or urethane sealant.
CLEANUP
• Remove excess Mapelastic AquaDefense (while fresh) with damp
sponge, soap and warm water. Any completely dried material may
be mechanically removed.
PROTECTION
• Protect from foot traffic, rain and freezing for 24 hours.
• Protect installed Mapelastic AquaDefense from contamination, excessive
heat and extended sun exposure until tile or stone is installed.
FLOOD-TESTING (per ASTM D5957)
If flood-testing is required, allow Mapelastic AquaDefense to cure at least 12
hours at 73°F (23°C) and 50% relative humidity. Actual curing time depends
on air and substrate temperature, substrate porosity and humidity. Expect
shorter drying times in warmer conditions, longer drying times in cooler
conditions.
INSTALLING CERAMIC TILE
OR NATURAL STONE
1. Mapelastic AquaDefense is ready to receive thin-set mortars for tile or
stone when dry to touch (about 30 to 50 minutes after applying second
coat).
2. Let Mapelastic AquaDefense cure for at least 8 hours before installing
medium-bed mortars (for large tile or stone), screeds (for leveling floors)
or epoxy adhesives.
3. For tile and stone installations, use a MAPEI polymer-modified
mortar meeting ANSI A118.4 or ANSI A118.11, or an epoxy mortar
meeting ANSI A118.15 ANSI A118.3. For the installation of resilient
or wood flooring over Mapelastic AquaDefense, adhere to the adhesive
recommendations or limitations for use over nonporous substrates.
EXPANSION AND CONTROL JOINTS
Installation with Mapeband:
Sealant
(depth is 1/2 width)
Rounded backup
(with no bond to sealant)
Bond
coat
Compressible backup
Concrete floor
Tile
Mapelastic
AquaDefense
Mapeband