
Owner`s manual


13
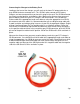
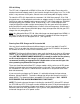
Now you should have a gray SB-50 connector with a positive and negative wire coming
out. (See figure 05) Use the appropriate lug or connector for your battery terminal and
connect it onto the other end of each cable. Connect the positive cable to the most
positive terminal of the battery pack. Connect the negative cable to the most negative
terminal of the battery pack.
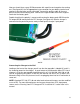
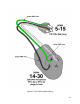
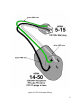
Double check that the polarity is correct and then plug the battery pack SB-50 into the
DC output SB-50 coming from the PFC charger (see figure 06). Now the charger is
connected to the pack and you are ready to hook up the charger’s input power.
fig
ure 06
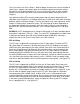
Connecting the Charger to the Wall
Looking at the front of the charger you will see that the top cable is labeled AC and it is
the incoming power for the charger. A great feature of the Manzanita Micro PFC line of
chargers is that they are capable of operating easily off 110,120, 208, 220, 230 or 240
volts of single phase AC power. In fact they can even be run off DC (this is done in the
Manzanita Plug-in Prius kits) but most users are plugging them into an AC wall outlet of
some sort.
NOTE: Standard PFC-30, PFC-40 and other buck enhanced chargers must be modified
to run off DC. For more information on running your charger from a DC input power
source see the “Running Your PFC Charger on DC instead of AC” section later in this
manual.