
Specifications


9. Secure the safety strap around the storage device.
10. Lower the lift platform to no more than 12 inches off the floor.
11. Transport the storage device to the cabinet.
12. Crank the lift platform up to the storage device installation level in front of
the cabinet.
Note
Make sure that the storage device will clear the internal SDI cables and
power cords when it is inserted in the cabinet.
13. Remove the safety strap from the storage device and slide it into the cabinet,
ensuring that it is securely seated on the cabinet guide rails.
14. Move the lifting device away from the cabinet. The cabinet guide rails will
support the weight of the storage device.
5.5 Installing an RA9x Disk Drive in SA600, SA650, SA800, and
SA850 Storage Arrays
All mounting hardware, internal SDI cables, and power cords are factory installed
for RA9x disk drive in SA600, SA650, SA800, and SA850 storage arrays. After
installing the disk drive, you are required only to connect the SDI cables and
power cords.
Note
Unless specifically noted otherwise, the RA9x installation procedures are
the same for the SA600, SA650, SA800, and SA850 storage arrays.
Section 5.5.1 is only applicable to SA600 storage arrays.
The procedures starting in Section 5.5.2 apply to all storage arrays.
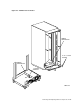
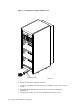
5.5.1 Removing the SA600 Stabilizer Plates
SA600 storage arrays shipped with a single drive (that is, SA600–CA and
SA600–CD) have stabilizer plates installed to make sure cabinet stability. As
shown in Figure 5–3, the two 11.4 kilogram (25 pound) iron stabilizer plates
(weights) are installed in position 1. You must remove these stabilizer plates
before installing a disk drive in position 1. Do not remove the stabilizer
plates until you are ready to install a storage device in position 1.
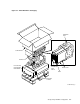
Use the following procedure to remove the stabilizer plates shown in Figure 5–3:
WARNING
Wear proper safety shoes during this procedure. Otherwise, you may
injure yourself.
1. Remove the front and rear cabinet panels. (Refer to Sections 4.1.1 and 4.1.2.)
2. Remove the four 1/4-inch nuts, helical split lock washers, and flat washers
that secure the first weight.
Storage Array Add-Ons and Upgrades 5–7