
Specifications


5.1 Required Tools
Installation and upgrade procedures require the following tools:
• #1 Phillips screwdriver
• #2 Phillips screwdriver
• 1/8-inch hex wrench
• 5/32-inch hex wrench
• 1/4-inch flat-bladed screwdriver
• Torque screwdriver, 3.63–4.54 kgs (8–10 lb) range.
5.2 Installation Precautions
Observe the following safety precautions when installing storage devices and
enclosures in storage arrays:
WARNING
Hazardous voltages are present inside the storage array cabinet and
installed components. You must be a qualified Digital Multivendor
Services engineer to install storage arrays or storage devices. Otherwise,
you may injure yourself or others and you may damage the equipment.
When you install a new component, for maximum safety, use the following
procedure for disconnecting and connecting the power source:
• Turn off the power control on all components in the cabinet.
• Turn off the power controller and disconnect it from the outlet.
• Turn off site power at the main circuit breaker.
• Place a tag-out tag on the circuit breaker.
• When you have finished with the installation, turn on site power at the main
circuit breaker.
• Remove the tag-out tag on the circuit breaker.
• Connect the power controller power cord to the outlet and turn it on.
• Turn on all components in the cabinet.
Complete safety and tag-out procedures are presented in the Digital safety
courses listed in the preface of this document.
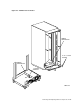
WARNING
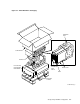
Some storage arrays require the use of a cabinet stabilizer foot to prevent
the storage array cabinet from becoming unstable when installing a
storage device. Failure to extend the cabinet stabilizer foot before lifting
the device into the cabinet may cause personal injury and damage to the
equipment. The cabinet stabilizer foot is shown in Figure 5–1.
5–2 Storage Array Add-Ons and Upgrades