
Specifications


CAUTION
Do not attempt to install a storage array unless you have received
training in electrostatic discharge (ESD) procedures and have taken
proper precautions against ESD. Wear an ESD grounding strap properly
connected to a known ground.
• An ESD strap is shipped with each H9646 cabinet.
• Two ESD bolts for connecting grounding straps are located in each
H9A00 cabinet.
4.1 H9646 Replacement Procedures
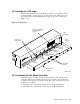
This section describes how to remove and replace the I/O bulkhead and the
power controller. Replacing either of these components require you to remove and
replace the front and rear panels.
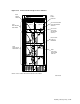
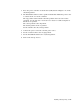
4.1.1 H9646 Front Panel
To remove the H9646 front panel, see Figure 4–1 and use the following procedure:
1. Unlock the two quarter-turn fasteners at the top of the panel. Use a hex
wrench to turn the fasteners counterclockwise.
2. Grasp the panel by its edges, tilt it toward you, and lift it approximately 2
inches. Remove the panel and store it in a safe place.
To replace the H9646 front panel:
1. Lift the front panel into place and lower it straight down until the tabs on the
panel’s lower edge engage with the corresponding slots on the support bracket
located at the base of the cabinet.
2. Hold the panel flush with the cabinet and turn the fasteners one-quarter turn
clockwise to lock.
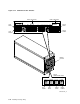
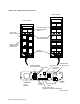
4.1.2 H9646 Rear Panel
To remove the H9646 rear panel, see Figure 4–2 and use the following procedure:
1. Unlock the two quarter-turn fasteners at the top of the panel. Use a hex
wrench to turn the fasteners counterclockwise.
2. Grasp the panel by its edges, tilt it toward you, and lift it up to disengage the
pins at the bottom. Remove the panel and store it in a safe place.
To replace the H9646 rear panel:
1. Lift the rear panel into place and fit the pins into the holes located at the top
of the I/O bulkhead.
2. Push the top of the panel into place and turn the fasteners one-quarter turn
clockwise to lock.
4–2 Removing and Replacing Cabinet Components