
Specifications
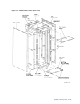
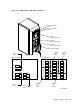
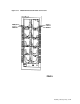

3.4.4 Installing the Rear Panel
Use the following procedure to install the rear panel:
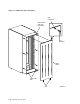
1. Lift the rear panel into place by fitting the two pins on the bottom of the
panel into the two slots in the filler panel as shown in Figure 3–9.
2. Push the top of the panel into place and turn the fasteners one-quarter turn
clockwise with a hex wrench to lock.
3.5 Connecting SDI Cables
Internal SDI cables are inside the storage array cabinet and connect storage
devices to an I/O port on the I/O bulkhead. External SDI cables connect one
storage device port on the I/O bulkhead to a server or controller. Internal
SDI cables and power cords are installed at the factory for configured storage
arrays. Installing and connecting these cables is only required for add-ons (see
Chapter 5).
This section explains how to connect external cables to each of the storage arrays.
Cable placement is different for each storage array.
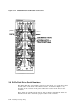
3.5.1 H9646 Cabinet External SDI Cable Connections
The SA550, SA600, SA650, SA800, and SA850 storage array internal SDI cables
are already connected to the I/O bulkhead.
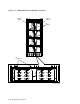
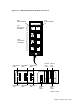
Two sets of external cables are required for dual porting. Be sure to tighten
the cable connector captive screws to the I/O bulkhead. Table 3–1 lists the SDI
cables. Figures 3–10, 3–11, and 3–12 show the external SDI cable connectors on
the I/O panel for the SA550, the SA600/SA800, and the SA650/SA850 storage
arrays, respectively.
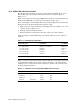
Table 3–1 H9646 SDI Cables
External SDI Cables
Standard
Part Number
Fire Code
Part Number
3.7 m (12 ft) cable BC26V–12/BC26G–12 BC26J–12
7.6 m (25 ft) cable BC26V–25/BC26G–25 BC26J–25
15.2 m (50 ft) cable BC26V–50/BC26G–50 BC26J–50
24.4 m (80 ft) cable BC26V–80/BC26G–80 BC26J–80
Installing a Storage Array 3–15