
Specifications
3.4.2 Installing the Filler Panels
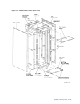
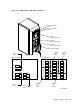
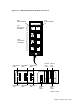
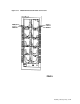
Locate the top and bottom spreaders shown in Figure 3–8. These bracing
structures are connected to the top and bottom of the cabinet. Use the following
steps to connect the filler panels to the spreaders as shown in Figure 3–7:
1. Place the top filler panel on the top spreader as shown in Figure 3–8.
2. Remove the wing nuts from the captive studs on the filler panel.
3. Push the two captive studs through the two slots on the spreader.
4. Move the filler panel toward you until the captive studs stop at the ends of
the slots.
5. Tighten the wing nuts on the captive studs.
6. Place the bottom filler panel on the bottom spreader as shown in Figure 3–8.
7. Remove the two wing nuts from the captive studs on the bottom filler panel.
8. Push the captive studs through the appropriate slots on the spreader.
9. Move the filler panel toward you until the captive studs stop at the ends of
the slots.
10. Tighten the wing nuts on the captive studs.
3.4.3 Positioning the Side Panels
Use the following procedures to position the side panels:
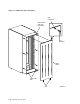
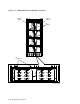
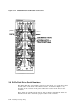
1. Loosen the six 1/4-20 hex nuts located on the top, middle, and bottom of the
sliding side panels as shown in Figure 3–8.
2. Pull the sliding side panels toward you until the U-shaped holes at the top
and bottom of the panels line up with the screw holes on the sides of the filler
panels as shown in Figure 3–7.
3. On each sliding panel, insert the 10-32 x 1/2-inch screws into the two
U-shaped holes at the top and bottom and tighten them.
The final position of the cabinet rear panel assembly is determined by the
number of storage devices installed.
a. For a fully populated storage array (for example, with 10 SA7x
enclosures), leave the rear panel assembly fully extended.
b. When the cabinet is partially populated, push the rear panel assembly as
far into the cabinet as necessary.
4. Position the two sliding panels and tighten the three 1/4-20 hex nuts on each
panel.
5. Loosen the four wing nuts on the filler panels.
6. Push the rear panel assembly back into the cabinet and tighten the wing
nuts.
7. Tighten the six 1/4-20 hex nuts on the two sliding side panels.
3–14 Installing a Storage Array