
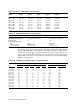
Specifications


3
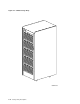
Installing a Storage Array
This chapter explains how to install a storage array. All the configurations
discussed in this chapter, except the SA550–UA/SA550–UD storage arrays, have
storage devices installed and the internal cabling connected at the factory. See
Chapter 5 for a description of the procedures for installing add-on storage devices
and upgrading storage arrays.
The SA550–UA and SA550–UD storage arrays are used for mounting RA8x disk
drives. See the Cabinet Management Program Installation Guide for installation
instructions.
The procedures in this chapter are applicable to the following cabinet types:
• H9646—The four-level cabinet used for the SA550, SA600/SA800, and
SA650/SA850 storage arrays
• H9A00—The five-level cabinet used for the SA900 storage array
Installing a storage array is a multistep process. The steps you complete are
determined by the type of storage array. In addition to the standard safety and
electrostatic discharge precautions you should always use, completion of the
following steps may be required:
1. Unpacking the cabinet (see Section 3.3)
2. Assembling the H9A00 cabinet (see Section 3.4)
1
3. Connecting the external SDI cables (see Section 3.5)
4. Recording RA7x disk drive serial numbers (see Section 3.6)
1
5. Selecting the input line voltage (see Section 3.7)
6. Installing OCP label (see Section 3.8)
1
7. Connecting power (see Section 3.9)
8. Verifying proper operation of the storage devices as described in the user or
service manuals
1
This step is not required for all installations.
Installing a Storage Array 3–1