
Specifications

5.13.6 Completing the Upgrade
The following procedure is the final phase of the upgrade procedure:
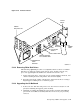
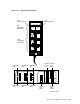
1. Replace the I/O bulkhead by pivoting it upward until it seats against the
bulkhead frame and securing it with the captive screw. (Refer to Figure 5–46.)
2. Place the power controller circuit breaker to the on (up) position.
3. Set the power controller Bus/Off/On switch to the on (middle) position.
4. Set the SA7x enclosure Master On/Off switch to on.
5. Set the RA9x disk drives circuit breakers to on.
6. Spin up all drives and place them on line.
7. Check out all devices as described in their respective user guides or service
manuals.
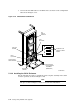
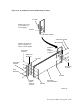
8. Replace the rear panel by lifting it into place and fitting the pins into the
holes located at the top of the I/O bulkhead.
9. Push the top of the panel into place and use the hex wrench to turn the two
fasteners one-quarter turn clockwise.
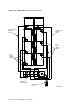
10. Lift the front panel into place and lower it straight down until the tabs on the
panel’s lower edge engage with the corresponding slots on the support bracket
in the cabinet base.
11. Hold the panel flush with the cabinet and turn the fasteners one-quarter turn
clockwise to lock.
12. If the unit has "SA600" already silk screened to the door, apply the new
stick-on SA650 medallion over the SA600 label. Remove the backing on the
SA650 medallion, position the template over the SA600 label, and install the
new medallion in the template slot.
13. If the unit already has an SA600 or SA800 medallion, remove it by
unscrewing the two wing nuts on the rear side of the door. Install the
new SA650 or SA850 medallion using the wing nuts.
14. Affix the new configuration label over the existing SA600/SA800 configuration
label.
15. Fill in the product conversion label and affix it to the rear of the unit adjacent
to the existing labels.
Storage Array Add-Ons and Upgrades 5–77