
Specifications
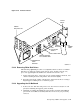
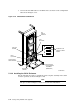
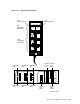
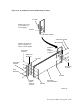
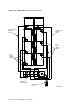
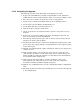


Figure 5–45 Power Controller
I
CB
O
J10
J11
J12
J13
COM-0117
GROMMETED
CORD
OPENING
POWER CONTROL
BUS CONNECTORS
BUS/OFF/ON
SWITCH
CIRCUIT
BREAKER
SERIAL/LOGO LABEL
FUSE
881
POWER
CORD
POWER
RECEPTACLES
STRAIN
RELIEF
5.13.2 Removing RA9x Disk Drives
This following optional procedure is accomplished whenever there is an RA9x
disk drive in either top position of the storage array. If this is not the case,
proceed to upgrading the I/O bulkhead as described in Section 5.13.3.
1. At the front of the drive, remove the screws, chassis stabilizer brackets, and
chassis retaining brackets and pull the drive forward slightly.
2. From the front of the cabinet, pull the drive forward and remove it using a
Digital-approved lifting device or with two people.
5.13.3 Upgrading the I/O Bulkhead
1. Remove the two disk drive I/O panels. Save the 12 #6 screws (six on each
panel) for installing the upgrade panel assembly.
2. Install the new RA9x I/O bulkhead panel and the new SA7x I/O bulkhead
panel in the I/O bulkhead assembly with the 12 #6 screws you previously
removed.
Storage Array Add-Ons and Upgrades 5–71