
Specifications
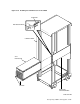
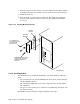

9. Push the adapter into the cabinet so that the adapter bracket aligns with the
mounting holes and secure with the two pan-head screws (10-32 x 3/4-inch).
10. Install the front door.
11. Close the front door and check for alignment. The TZ8x7 tape subsystem
should be flush with the front of the door and the adapter flush with the
recess port.
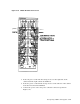
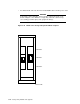
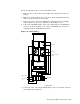
Figure 5–42 Installing Mounting Brackets
TA857
B
A
CABINET
UPRIGHT
ADAPTER
BRACKET
#10-32 MOUNT IN
EXISTING HOLES IN
NUT BAR THAT
MOUNTS RAIL
REMOVE EXISTING TOP (2)
SCREWS ON TA857 AND
REPLACE MOUNTING
BRACKET
CXO-3989A-MC
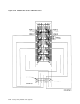
5.12.3 Installing Cables
For all TA8x7 storage subsystem installations, you must install the following
items:
• The 7.6 meter (25 foot) external SDI/STI cable between the adapter-interface
and the SDI/STI controller
• The internal SCSI-SDI cable between the adapter-interface and the TZ8x7
tape subsystem
• The power cords from the power controller to the TZ8x7 tape subsystem and
the adapter-interface
Each TA8x7 storage subsystem is shipped with these four cables.
5–66 Storage Array Add-Ons and Upgrades