
Specifications
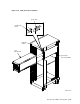
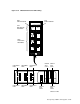
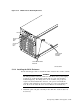

2. Lift the SA7x enclosure to the installation position (see Figure 5–38).
a. Lift the enclosure to the front of the cabinet with the aid of a Digital-
approved lifting device or with two people.
b. Turn the enclosure so its side grooves are facing toward the cabinet rails.
(Refer to Figure 5–38).
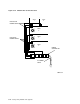
3. Seat the enclosure into the cabinet.
a. Slide the enclosure side grooves into the cabinet guide rails as shown in
Figure 5–38, and push the enclosure all the way to the rear of the cabinet.
b. Remove the lifting device.
c. Using the two 10-32 x 1/2-inch screws that came with the enclosure,
connect the two chassis retaining brackets (mounted on the side of the
enclosure) to the cabinet. Tighten them securely. The recommended
torque is 8 to 10 inch-pounds. (Refer to Figure 5–38.)
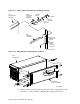
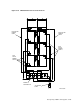
4. Install the OCP for a SA900 cabinet left side installation.
Note
If the SA900 cabinet is to be installed on the right side, proceed to step 5.
a. Check that the three enclosure connector (TB1) mounting screws are
tight.
b. Align the OCP with the TB1 and push until the OCP is secure.
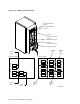
5. Install the OCP for a SA900 cabinet right-side installation.
a. Loosen the two outer screws on TB1.
b. Remove the center screw under ‘‘Attach Left Control Panel’’ on TB1 and
slide TB1 to the left.
c. Insert and tighten the center screw under ‘‘Attach Right Control Panel’’
on TB1.
d. Tighten the two outer screws on TB1.
CAUTION
Do not bend the alignment or connector pins when installing the OCP.
The panel should fit without being forced.
e. Align the OCP with the TB1 and push until the OCP is secure.
5–58 Storage Array Add-Ons and Upgrades