
Specifications

5.10.4 Completing the Installation
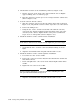
When you have finished connecting SDI cables and power cords, complete the
installation as follows:
1. Restore power to the cabinet as explained in Section 3.9.
2. Turn on all storage devices installed in the cabinet. Spin up all drives
and place them back on line. Then, complete the appropriate checkout
procedure. (See the appropriate component user guide or service manual for
instructions.)
3. Replace the front and rear cabinet panels. (See Section 4.1.)
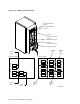
5.11 Installing an SA7x in an SA900 Storage Array
This section explains how to install an SA7x enclosure in an SA900 storage array.
WARNING
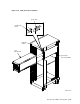
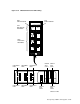
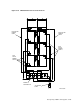
To maintain cabinet stability, always install components in the order
shown in Figure 5–18. Failure to comply may cause the cabinet to tip
over causing personnel injury and equipment damage.
5.11.1 Preparing for Installation
Internal SDI cables and power cords are installed in SA900 storage arrays only
when a storage device is installed. The internal SDI cables and power cords are
shipped with each add-on and you must install them. The contents of the SA7x
add-on kit are as follows:
• SA7x enclosure
• Guide rail plate assembly
• Hardware mounting kit
• Internal SDI cables
• Power cord
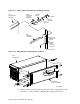
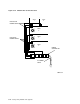
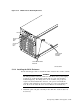
The hardware mounting kit includes two sets of chassis retaining brackets.
The chassis retaining brackets shown in Figure 5–37 are for the H9A00 cabinet.
They attach to SA7x enclosure guide rail and the cabinet frame.
5–56 Storage Array Add-Ons and Upgrades