
Specifications


5.10.2 Installing the Enclosure
Use the following procedure to install an enclosure in the storage array:
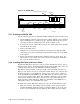
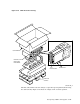
1. Lift the enclosure into position at the front of the cabinet with the aid of a
Digital-approved lifting device or with two people. (See Section 5.4.) Turn the
enclosure so its side grooves are facing toward the cabinet rails, as shown in
Figure 5–30.
WARNING
A fully-populated enclosure, with four disk drives and a power supply,
weighs up to 40 kilograms (88 pounds) and can injure you if you lift it
improperly. If a lifting device is not available, two people are required to
lift and install the enclosure, or one person can lift it by first lightening
its weight. To lighten the weight, remove the disk drives and power
supply. (See the SA7x Enclosure Service Manual for instructions.)
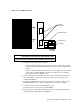
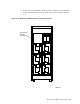
2. Seat the enclosure side grooves securely on the cabinet guide rails as shown
in Figure 5–30, and slide the enclosure all the way back into the cabinet.
3. Remove the lifting device.
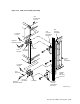
4. Install two 10-32 x 5/8-inch flat-head screws through the chassis retainers
and into the chassis retaining brackets. Tighten them securely. The specified
torque is 8 to 10 inch-pounds. (Refer to Figure 5–29.)
5. Install two 10-32 x 5/8-inch conical washer/screws and flat washers that
secure the chassis retainer to the cabinet front vertical upright. (Refer to
Figure 5–29.) Tighten them securely.
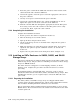
6. To secure the rear of the enclosure to the cabinet rear vertical upright,
assemble the rear clamping parts (rear retainer chassis bracket, wedge block,
flat washer, helical washer, and screw) as shown in Figure 5–31. Tighten the
screws securely.
Figure 5–32 provides a full view of the guide rail plate and clamping
assemblies.
7. To mount the OCP, you must adjust the mounting bracket on the SA7x. The
diagram affixed to the mounting bracket shows the proper alignment. To
align the bracket, use the following procedure:
a. Loosen the upper two Phillips head mounting screws.
b. Remove the lower Phillips head mounting screw.
c. Slide the bracket left or right to position the hole in the bracket over the
hole in the SA7x.
d. Insert the lower mounting screw.
e. Tighten the upper two mounting screws.
5–48 Storage Array Add-Ons and Upgrades