
Specifications


7. Route the power cords from the SSDs and enclosures on the left side of the
cabinet down the left vertical I/O bulkhead.
8. Connect the opposite end of the power cord to the appropriate connector on
the power controller.
9. Coil any excess power cord in front of the power controller.
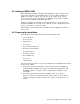
10. Connect the external SDI cables to the vertical I/O bulkhead. Be sure to
tighten the captive screws on the connectors at the bulkhead.
11. Slide the external SDI cable through the appropriate slot in the filler panel.
If necessary, remove the cable retainers on the filler panel to more easily
access the slot. Then, replace the cable retainers.
5.9.3 Completing the Installation
Complete the installation as follows:
1. Restore power to the cabinet as explained in Section 3.9.
2. Turn on all storage devices in the cabinet.
3. Spin up all drives and place them on line.
4. Check out all storage devices as described in the component user guide or
service manual.
5. Make sure that the rear panel will clear the external cables. If necessary,
adjust the side panels to provide additional clearance as described in
Section 3.4 .
6. Replace the rear panel and close the front panel. (Refer to Figure 3–9.)
5.10 Installing an SA7x Enclosure in SA550, SA650, and SA850
Storage Arrays
This section explains how to install an SA7x enclosure in the SA550, SA650, and
SA850 storage arrays. The procedures for installing an enclosure in these storage
arrays are almost identical.
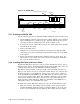
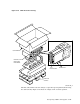
The SA7x enclosure is shipped in a sealed shipping container, as shown
in Figure 5–26. Complete the procedures described in Section 5.3.1 before
proceeding.
All mounting hardware, internal SDI cables, and power cords are factory
installed for SA7x add-ons in the SA550, SA650, and SA850 storage arrays. After
installing the enclosure, you are required only to connect the SDI cables and
power cords.
5.10.1 Preparing for Installation
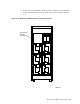
The SA550, SA650, and SA850 storage arrays are shipped with the SA7x
enclosure guide rail plates installed for the add-ons. Each add-on SA7x enclosure
has a hardware mounting kit which contains two sets of brackets:
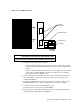
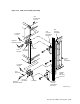
The top and bottom chassis retaining brackets shown in Figure 5–29 are for the
H9646 cabinet. These brackets mate to the chassis retainer attached to the SA7x
enclosure guide rail.
5–42 Storage Array Add-Ons and Upgrades