
Specifications


5.8 Adding an ESE50 SSD
When installing an ESE50 solid-state disk (SSD) in the SA900 storage array
cabinet, the CK–SA900–L2 installation kit is required. When installing an
ESE50 in an SA600 or SA800 series storage array cabinet, please refer to
Section 5.5 of this manual. Installation of an ESE50 in the SA600 or SA800
series cabinet is identical to the RA9x disk drive.
BC26V–xx, BC26G–xx, or BC26J–xx external SDI cables are required when
mounting an ESE50 in any of the above cabinets. If your configuration is dual
ported, you will have to order two cables.
The following section explains how to install an add-on ESE50 in the SA900
storage array.
5.9 Preparing for Installation
The CK–SA900–L2 installation kit includes the following items:
• Screw shield (6)
• Power cord (1)
• SDI cable (2)
• Bar nut (1)
• Rail chassis assembly (1)
• Bracket rail assembly (1)
• Bar insert nut (1)
• Bracket d-lock (2)
• Bar stabilizer (1)
• Screws (9)
• OCP label (1)
Use the following procedure to prepare for installation of the ESE50 in the SA900
storage array cabinet:
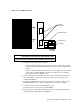
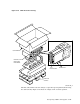
1. Remove the OCP, shown in Figure 5–24, from the front of the ESE50 by
gently pulling it straight out to protect the OCP during installation. Put
the ESE50 OCP in a safe place while completing the remainder of the
installation.
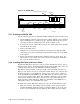
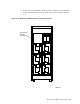
2. Determine which cabinet position the ESE50 will occupy. Refer to
Figure 5–18 for the recommended RA9x add-on sequence. Each cabinet
location is assigned a number which is the sequence in which devices are
added.
Storage Array Add-Ons and Upgrades 5–39