
Specifications


g. From the front, insert and tighten a flathead screw through the top hole
in the guide rail plate to the U-nut mounted on the cabinet front vertical
upright.
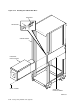
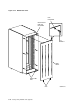
h. Tighten the four flathead mounting bracket screws as shown in
Figure 5–16.
5.7 Installing an RA9x Disk Drive in an SA900 Storage Array
This section explains how to install RA9x disk drives in the SA900 storage array.
All internal SDI cables and power cords are factory installed for storage devices
installed at the factory. You must install and route internal SDI cables and power
cords for any storage device and install the mounting hardware.
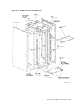
WARNING
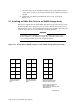
To maintain cabinet stability, always install components in the order
shown in Figure 5–18. Failure to comply may cause the cabinet to tip
over causing personnel injury and equipment damage.
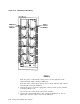
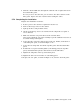
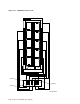
Figure 5–18 Storage Device Add-On Sequence for the SA900 Storage Array (Front View)
8
9
7 6
5 4
3 2
1
0
ADD-ON SEQUENCE
RA9x DISK DRIVES
ONLY
8
9
3 2
1 0
5 4
7
6
ADD-ON SEQUENCE
SA7x ENCLOSURES
ONLY
8
9
7 6
5 4
3 2
1
0
ADD-ON SEQUENCE
MIXED RA9x DISK DRIVES
AND SA7x ENCLOSURES
FIRST, LOAD ALL RA9x DISK
DRIVES SEQUENTIALLY.
THEN, LOAD SA7x ENCLOSURES
SEQUENTIALLY.
CXO-3568A-MC
5–30 Storage Array Add-Ons and Upgrades