
Specifications


5.5.4 Installing SDI Cables and Power Cords
The storage arrays are shipped with internal SDI cables and power cords for
storage devices. You need only to connect the internal SDI cables, power cords,
and external SDI cables. External SDI cables are ordered separately and shipped
with the add-on. (Table 3–1 lists the external SDI cables.)
Use the following procedure to connect SDI cables and power cords:
1. On the rear of the RA9x disk drive, make sure that the Line Voltage Selector
switch is in the proper position (120 Vac or 240 Vac), and that the RA9x drive
circuit breaker is off.
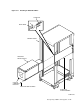
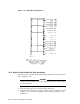
2. Connect the SDI cables to the Port A and Port B connectors on the rear of the
RA9x disk drive.
• Figure 5–12 shows the cable connections for the SA600/SA800 storage
array.
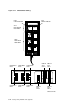
• Figure 5–13 shows the cable connections for the SA650/SA850 storage
array.
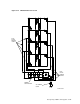
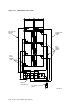
3. Connect the power cord to the rear of the RA9x disk drive.
4. Connect the power cord to power controller as shown in the following figures:
• Figure 5–14 shows the power cord connections for the SA600/SA800
storage array.
• Figure 5–15 shows the power cord connections for the SA650/SA850
storage array.
5. Connect the external SDI cables to the storage array, as shown in Figures
5–12 and 5–13.
Be sure to tighten the captive screws when connecting the external cables to
the bulkhead.
5.5.5 Completing the Installation
Complete the installation as follows:
1. Restore power to the cabinet as explained in Section 3.9.
2. Turn on all storage devices in the cabinet.
3. Spin up all drives and put them on line.
4. Check out all storage devices as described in the component user guide or
service manual.
5. Replace the rear panel and front panel as described in Sections 4.1.1 and
4.1.2.
5–20 Storage Array Add-Ons and Upgrades