
Specifications
5.5.3 Installing the Disk Drive
Use the following procedure to install the disk drive in the storage array:
1. Lift the disk drive into position at the front of the cabinet with the aid of a
Digital-approved lifting device as described in Section 5.4 or with two people.
Turn the disk drive so its side grooves are facing toward the cabinet guide
rails.
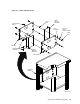
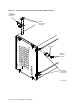
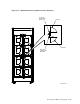
2. Seat the disk drive side grooves securely on the cabinet guide rails as shown
in Figure 5–11, and slide the disk drive all the way back into the cabinet.
3. Remove the lifting device.
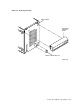
4. Connect the chassis stabilizer bracket to either the top or bottom of the disk
drive (refer to Figures 5–9 or 5–10), using the two short, flat-head beveled
screws (8-32 x 1/4-inch). (Refer to Figure 5–7.)
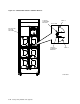
5. Connect the chassis retaining brackets on the side of the disk drive to the
cabinet with the long pan-head screws (10-32 x 3/4-inch) that came with the
disk drive as shown in Figure 5–11.
6. Reattach the chassis stabilizer bracket to the cabinet using the serrated
hex-head bolts.
7. Replace the OCP at the top of the drive.
If the bezel connector cap is in the way, remove it and replace the OCP. Then
move the bezel connector cap to the bottom connector. (Refer to Figure 5–4.)
5–18 Storage Array Add-Ons and Upgrades