
Service manual


6
Replacing RA7x Disk Drives
This chapter explains how to install and remove an RA7x disk drive in an SA7x
enclosure.
Table 6–1 lists the the types of disk drives that are authorized for installation in
each SA7x enclosure. Unless otherwise specified, a maximum of four disk drives
of each type, or a combination of disk drives can be installed in an enclosure.
Table 6–1 Authorized Disk Drives Installations
Enclosure RA70 RA71 RA72 RA73
SA70 Yes No No No
SA71 Yes Yes Yes Yes
1
SA72 Yes Yes Yes Yes
1
SA73 Yes Yes Yes Yes
1
A maximum of three drives may be installed.
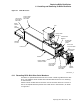
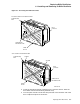
Figure 6–1 shows the major subassemblies of the SA7x enclosure. Except for
the RA70 disk drive designation, this illustration is accurate for all the SA7x
enclosures.
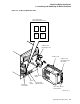
CAUTION
Do not attempt to install a disk drive unless you have received training
in electrostatic discharge (ESD) procedures and have taken proper
precautions against ESD. Wear an ESD grounding strap properly
connected to a known ground. Refer to Figure 1–4 for the proper use of
an ESD grounding strap.
Note
If the SA7x enclosure is installed in a storage array cabinet when you are
attempting to install or remove an RA7x disk drive, you must first remove
or open either the cabinet’s front or rear panel. See the appropriate
storage array guide for instructions on removing and installing cabinet
panels.
Replacing RA7x Disk Drives 6–1