
Installation guide


6.1 Steps to Install
• Verify the operation of the enclosure after a successful installation
Follow all the steps in each of these parts in the order they are presented and
do not skip any steps.
Remember that the magazine tape subsystem installs in positions 5 and 6 and
4 and 3 only.
The first step is to unpack the shipping container. See Section 6.1.1.
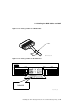
6.1.1 Unpacking the Magazine Tape Subsystem
The subsystem is shipped in an environmental barrier bag with desiccant, the
container, and all packing materials.
Note
After unpacking, retain the container and all packing materials.
At this time, examine the subsystem for physical damage. If you find
any damage, do not attempt to install the subsystem. Notify your office
immediately.
If there is no damage, then unpack all the boxes and bags, and identify all the
parts by using Table 6–2.
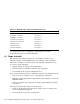
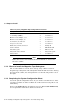
Table 6–2 Magazine Tape Subsystem Kit Contents
Description Quantity Part Number
Magazine tape subsystem 1 Subsystem specific
Hardware mounting assembly 1 Subsystem specific
Slide mount assembly 1 –
1
Weldment bracket (front top) 1 70–26052–01
Weldment bracket (front bottom) 1 70–26052–02
Shoulder screw, 10-32. 0.500 4 12–24007–01
Shoulder screw, 10-32, 0.438 6 12–24007–02
Lock washer, internal steel 10 90–06637–00
DSSI cable retainer 1 74–41302–01
1
The slide mount assembly comes assembled and does not have a single part number.
(continued on next page)
Installing the Magazine Tape Subsystem in an Sx300 Storage Array 6–3