
Installation guide
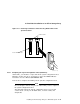
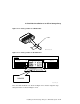
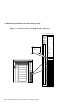


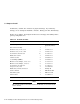

Table 5–1 SF7x Required Tool List
Description Part Number
Lifting device FC–10117–AC
#0 Phillips screwdriver 29–10991–00
#1 Phillips screwdriver 29–11001–00
#2 Phillips screwdriver 29–11005–00
1/8-inch slot screwdriver 29–10802–00
5/16-inch slot screwdriver 29–10960–00
1/8-inch hex key 29–26115–00
3/16-inch hex key 29–26118–00
11/32-inch nutdriver 29–10674–00
See Chapter 8 for tools or equipment recommended for use when
troubleshooting after a successful installation.
5.1 Steps to Install
CAUTION
If a lifting device is not available, two people are needed to install the
disk or tape drive into the cabinet. The disk or tape drive must be
handled carefully. Manual installation is not recommended.
The following procedures assume that the existing Sx300 storage array is
correctly installed and configured.
The SF7x storage enclosure that you are installing may contain two or four
RF72 disk integrated storage elements (ISEs). To determine if the SF7x
contains two or four, simply look at the front of the enclosure. Remove the
front bezel of the Sx300 storage array. If you can see two disk ISEs in the front
of the SF7x, then the enclosure contains four ISEs (SF7x–JK variant). If you
do not see two ISEs in the front of the enclosure, then that enclosure contains
only two ISEs (SF7x–HK variant). If you wish to verify an enclosure that is
already installed in a cabinet or array, observe the number of seven-segment
displays that are lit on the OCP. If the top two displays are lit, then the
enclosure contains only two RF72 disk ISEs.
5–2 Installing the SF7x Storage Enclosure in an Sx300 Storage Array