
Owner's Manual

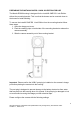

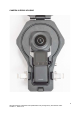
Table Of Contents
- CAUTIONS FOR USE
- WARRANTY AND LIMITATIONS OF LIABILITY
- PACKAGE LIST
- FEATURES
- SPECIFICATIONS
- PREPARING THE INSTA360 ONE RS 1-INCH 360 EDITION FOR USE
- RECOMMENDED CAMERA SETTINGS FOR INSTA360 ONE RS
- CAMERA IN RS360 HOUSING
- PRE-DIVE CHECKLIST
- POST-DIVE CHECKLIST
- START A Recording
- STOP A RECORDING
- CARE AND MAINTENANCE
- TRADEMARKS
- CONTACT
PRE-DIVE CHECKLIST
1. Confirm the Insta360 ONE RS is charged and properly seated
2. Confirm the USB-C port plug is installed on the camera’s charge port.
Note: The port plug is designed to prevent damage to the battery electronics
from water that may drop into the housing when it is opened. If the port plug is
damaged or lost we recommend covering the charge port with electrical tape.
3. Confirm the O-ring is in place, undamaged, and free of debris.
4. Confirm the O-ring was not pinched while the housing was closed.
5. Confirm both latches are fully closed.
6. Press the power button to power on Insta360 ONE RS.
7. Observe display to confirm Insta360 ONE RS is starting.
8. Confirm the status LED on the back is blinking red to show the camera is
recording.
9. Press the power button to stop recording and turn off Insta360 ONE RS.
POST-DIVE CHECKLIST
Place the enclosure inside the neoprene bag to protect the domes while
getting out of the water.
Remove the housing from water.
Rinse the enclosure with fresh water after use.
Wipe the housing with a towel and hold it upright before opening so that no
water can drip inside.
Remove the camera and charge it.
o Note: Please use a 5V/2A power adapter to charge your ONE RS
o The battery can only be charged with a USB-A to USB-C cable.
START A RECORDING
Prerequisite: Quick capture is turned on.
Press the button to turn on camera and start recording.
Observe display to confirm Insta360 ONE RS is starting.
Confirm the status LED on the back is blinking red to show the camera is
recording.
STOP A RECORDING
Press the button to turn on camera and start recording.
Observe display to confirm Insta360 ONE RS has received the command.
Confirm the status LED on the back has stopped blinking.
All rights reserved. Information and specifications may change at any time without notice.
Version 1.1, 2023-01-19
9