Pruner E System Élagueur E System E-System-Astsäge Owners manual and safety instructions Manuel d’utilisation et consignes de sécurité Benutzerhandbuch und Sicherheitshinweise © 2006 Mantis, Div. of Schiller-Pfeiffer Inc. All Rights Reserved. © 2006 Mantis, Division de Schiller Pfeiffer Inc. Tous droits réservés. © 2006 Mantis, Division von Schiller Pfeiffer Inc. Alle Rechte vorbehalten.
Table of contents Operation . . . . . . . . . . . . . . . . . . . . . . . . . .7 Important information Introduction . . . . . . . . . . . . . . . . . . . . . . . . . . . .1 Special safety information . . . . . . . . . . . . . . . .1 Maintenance . . . . . . . . . . . . . . . . . . . . . . .8 Sharpening the blade . . . . . . . . . . . . . . .10 Safety and warnings Safety labels . . . . . . . . . . . . . . . . . . . . . . . . . . .2 General safety rules . . . . . . . . . . . . . . . . . . . . .
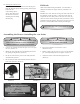
Safety and warnings A. Safety labels Please pay particular attention to the warning and information labels found on various parts of this pruner attachment unit. They are an important part of the safety system. These labels must be replaced in time due to abrasion, etc. It is your responsibility to replace the labels when they become hard to read. The location of these labels and their part numbers for ordering are shown below.
General safety rules 1. Remove branches in sections. Maintain safe operating positions, to avoid risk of being struck by falling branches or by those that rebound after hitting the ground 2. Cover saw chain with guard during transport and storage. 3. Do not hit rocks, stones, tree stumps, and other foreign objects with the working unit. If saw chain strikes an obstruction, stop engine immediately, unplug unit and inspect saw chain for damage. 4. Do not operate with a dull, fractured or damaged saw chain.
Extension cord chart (minimum cord gauge (AWG) Length (metres) .3 to 7.8 7.9 to 15.5 15.6 to 30.6 30.7 to 45.7 Cord gauge (AWG) 18 16 14 12 17. Stay alert. Watch what you are doing. Use common sense. Do not operate tool when you are tired, ill or under the influence of alcohol or other drugs. 18. Check damaged parts. Before further use of the tool, a guard or other part that is damaged should be carefully checked to determine that it will operate properly and perform its intended function.
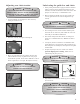
35. Securing the extension cord. Bend the extension cord about 40 cm from the plug end. Push that bend through the oblong opening, then loop the bend under the cord retaining clips as shown. This will prevent the extension cord from detaching from the hedge trimmer plug. Kickback With a basic understanding of kickback, you will reduce or eliminate the element of surprise that may contribute to an accident.
Adjusting saw chain tension WARNING DANGER IT IS VERY IMPORTANT TO MAINTAIN THE PROPER CHAIN TENSION. RAPID WEAR OF THE GUIDE BAR OR THE CHAIN COMING OFF EASILY CAN BE CAUSED BY IMPROPER TENSION. 1. Loosen mounting nut and adjust the chain tension by turning the tensioner screw Lubricating the guide bar and chain 1. Power pruning mechanism is equipped with the automatic oiling system that can be adjusted in the field. The saw chain bar, and chain are lubricated when chain rotates.
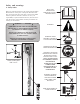
Attaching the Pruner to the Power Head Assembly Pruning techniques No tools are required to attach the pruner to the power head. 2. If branch is long, remove it in several pieces. 1. Pull the spring pin up on the adapter of the power head shaft assembly. (Picture 7) 3. Do not stand directly under the branch being cut. 2. Carefully fit pruner drive shaft into adapter, making sure that male spline of the inner drive shaft engages into the female spline socket of the power head shaft. 1.
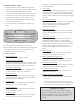
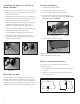
Service maintenance guide Area Maintenance procedure Frequency Lubricate 20-25 hrs Spline male/female connection of the inner drive shaft Remove Lubricate Gear case Grease nipple Use a grease gun to insert lubricant into the grease nipple of the gear case. Use EP2 lithium grease 20-25 hrs Guide bar Remove sawdust from the groove Inspect/clean/replace GUIDE BAR SECTION GOOD WORN The guide bar opening should be always a square. When it’s worn, the chain tilts.
Service maintenance guide Area Maintenance procedure Frequency Oiling port Inspect/clean Before each use Oiling port Nose sprocket Grease port of the nose sprocket Clean/lubricate Before each use Saw chain Inspect/clean/sharpen/lubricate/replace Before each use Screws/nuts/bolts Inspect/tighten/replace Before each use Area Maintenance Before use Cutting Parts Replace if something is wrong Screws, nuts bolts Tighten, replace Every 25 Every 50 Every 100 hours hours hours Note
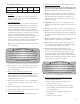
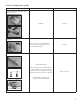
Saw chain sharpening procedure • A Low-kickback Chain • Low-vibration Chain • Narrow-kerf Chain SIDE VIEW END VIEW TOP VIEW FILING FILE DIRECTION TOOLS FOR FILING Description 4.5 mm Round file 4.5 mm Assembled file guide .025 inch Drop-centre depth-gauge tool Depth-gauge file (flat) Square-ground Filing WHO SHOULD PERFORM SQUARE-GROUND FILING? Most chain saw users will probably never need to use square ground chain, nor learn to perform square ground filing.
GULLET FILING Approximately every 5th sharpening, clean out gullets with a 7/32" round file. File gullets from the inside out (the side opposite from sharpening). Leave a 1/8 inch (3.175 mm) shelf behind the gullet. The depth-gauge setting for all square-ground chisel chain is .025 inch (0.64 mm). Storage 1. Drain the oil tank. 2. Remove sawdust. 3. Lubricate for rust prevention 4. Use chain cover. 5. Store indoor.
Pruner “E” System exploded view 24 21 23 51 25 22 39 6 1 3 38 49 5 4 50 26 27 14 9 48 28 29 15 7 12 1 30 19 8 31 20 16 17 18 2 13 16 5 44 32 35 33 37 36 40 43 34 41 47 46 42 45 47 46 12
Pruner “E” System parts list KEY # DESCRIPTION PART # QTY 1 GEAR CASE COVER 3331100 1 2 BEARING 6001-2Z 331101 3 GEAR CASE 4 DESCRIPTION PART # QTY 27 BEVEL, PINION 331119 1 1 28 BEARING 609 331120 1 331102 1 29 BEARING 609-2Z 331121 1 BEARING 627 331103 1 30 SNAP RING 331122 1 5 BOLT M5X12 331500 5 31 SNAP RING 331123 1 6 GREASE FITTING 331104 1 32 CULLER 331124 1 7 SCREW, TENSIONER 331501 1 33 SPROCKET 331125 1 8 CHAIN TENSIONER 331105 1 3
2 YEAR LIMITED SERVICE & WARRANTY POLICY FOR PRUNER ATTACHMENT MANTIS extends this limited warranty against defects in material and workmanship for a period of two years from the date of purchase, to the first retail purchaser and each subsequent owner during the warranty period. This warranty covers all portions of the Mantis Pruner Attachment.
MANTIS® DE FR GB NL NO EG-KONFORMITÄTS-ERKLÄRUNG DÉCLARATION DE CONFORMITÉ CE EC DECLARATION OF CONFORMITY EG CONFORMITEITSVERKLARING EU OVERENSSTEMMELSESERKLÆRING ES IT SE DK FI DECLARACION DE CONFORMIDAD CEE DICHIARAZIONE DI CONFORMITÀ CEE EG FÖRSÄKRAN OM ÖVERENSSTÄMMELSE EU OVERENSSTEMMELSESERKLÆRING EY-VAATIMUSTENMUKAISUUSVAKUUTUS DE FR GB NL ES IT SE DK NO FI Wir erklären in alleiniger Verantwortung, dass die elektrische 230-V-, 50-Hz-E-System-Astsäge mit einer installierten Nettoleistung von 0,95
DE Modell Schalldruckpegel an Bedienerposition dB (A) Schalleistungspegel (gemessen) dB (A) Schalleistungspegel (garantiert) dB (A) Schwingungsmessungen m/s2 Bügelgriff FR Modèle Pression sonore au poste de l’opérateur dB (A) Niveau sonore (mesuré) en dB (A) Niveau sonore (garanti) en dB (A) Hinterer Griff Mesure des vibrations en m/s2 Poignée annulaire GB Model Sound Pressure at the operator position dB (A) Sound Power Level (measured) dB (A) Sound Power Level (guaranteed) dB (A) Poignée
MANTIS 1028 Street Road Southampton , PA 18966 + (215) 355-9700 P/N 331706 7/06 REV B