
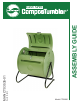
Installation Guide

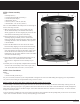


4
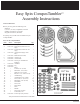
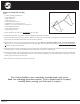
STEP 1: Aerator Panel Assembly
Select:
• 1 Aerator Panel (large center hole) (item 4)
• 1 Aerator Base (item 7)
• 1 Aerator Cap (item 6)
• 1 Wing Nut (item 14)
• 1 Bolt, 1/4” x 3-1/4” (6 mm x 8.25 cm) (item 15)
1) Insert the 1/4” x 3-1/4” (6 mm x 8.25 cm) Bolt through
the Aerator Cap and position them into the recess on the
inside of the Aerator Panel.
2) Position the Aerator Base, smooth side inward, over the
Bolt and into the recess on the outside of the Aerator
Panel.
3) Thread the Wing Nut onto the end of the Bolt until hand
tight. Be careful not to over-tighten the assembly.
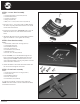
STEP 2: Door Panel Assembly
Select:
• 1 Door Panel (4 holes near one edge) (item 2)
• 1 Latch Strike (item 22)
• 2 Socket Bolts (item 20)
• 2 Screws, #10 (item 21)
• 2 Lockwashers, #10 (item 26)
• 1 Handle (item 24)
• 2 Screws, 5/8” (16 mm) (item 25)
1) From the inside, insert a Socket Bolt through the two
larger center holes in the Door Panel. Place the Latch
Strike against the outside of the Door Panel over the
ends of the Socket Bolts, securing it in position as shown
with Lockwashers and Screws.
2) Attach the Handle to the outside of the Door Panel with
the 5/8” Screws through the outer holes.
STEP 3: Front Panel Assembly
Select:
• 1 Front Panel (2 holes near one edge) (item 3)
• 1 Latch (item 23)
• 2 Socket Bolts (item 20)
• 2 Screws, #10 (item 21)
• 2 Lockwashers, #10 (item 26)
As with the Latch Strike, secure the Latch against the
out side of the Front Panel as shown with the Socket Bolts,
Lockwashers and Screws.
15
6
4
14
7
24
2
22
21
26
20
26
21
3
25
21
23