
Installation Guide


5
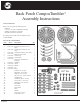
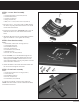
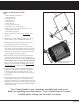
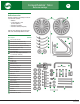
STEP 6: Frame/Drum Assembly
Select:
• 1 Drum Assembly (from Step 4)
• 1 Axle Rod (item 9)
• 2 Wheels (item 10)
• 1 Handle (item 11)
• 2 Legs (item 12)
• 1 Brace (item 13)
• 2 1/4” Lock Nuts (item 14)
• 2 Flatwashers, 1/4” (6 mm) (item 15)
• 2 Bolts, 1/4” x 3-1/4” (6 mm x 8.25 cm) (item 17)
• 2 Axle Bushings (item 18)
• 2 Axle Rod Caps (item 19)
1) Tap an Axle Rod Cap evenly onto one end only of the
Axle Rod.
2) Slide a Wheel onto the Axle Rod, making sure the Axle
Cap ts into the “cup” in the middle of the Wheel.
3) Pass the Rod (with Wheel) through the cross-hole in a
Leg and through the small tube of the Brace.
4) Noting the position of the rst Leg to the Brace, hold
the second Leg in the same position, and slide it over the
other end of the Axle Rod, followed by the second Wheel
with the “cup” on the outside. Tap the second Axle Rod
Cap rmly onto the end of the Axle Rod.
5) Slide the Handle over the ends of both Legs until their
holes line up. Rotate the Brace so the hole in one end
aligns with those of the Handle and Leg. Make sure both
attened Brace ends rest on the outside of the Handle.
Pass a 3-1/4” (8.25 cm) Bolt through all 3 parts. Keep the
Bolts loose and just through the tubing. Do not use any
other Hardware yet. Repeat this step for the other side.
6) Position the Drum Assembly (with Door) between the
Frame Legs so the Handle on the Door faces FRONT.
Now remove the Door and carefully work the 3-1/4”
(8.25 cm) Bolts in the Frame through the center holes of
both Endcaps.
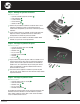
7) From inside the Drum, insert an Axle Bushing over the
end of the Bolt and into the center hole of the Endcap.
Now place a Flatwasher over the Bolt and against the Axle
Bushing and secure it with a Lock Nut, tightening only until
the Flatwasher is snug against the Axle Bushing. Repeat this
step for the other side.
11
13
12
14, 15, 18
Position Drum Assembly with
Latch in this location.
19
10
9
17
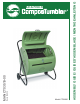
Your ComposTumbler is now completely assembled and ready to use.
Read your operating instructions manual, “How to Make Superior Compost”,
carefully before starting your first batch of compost.